What’s the difference between SIP trunks and PRI trunks?

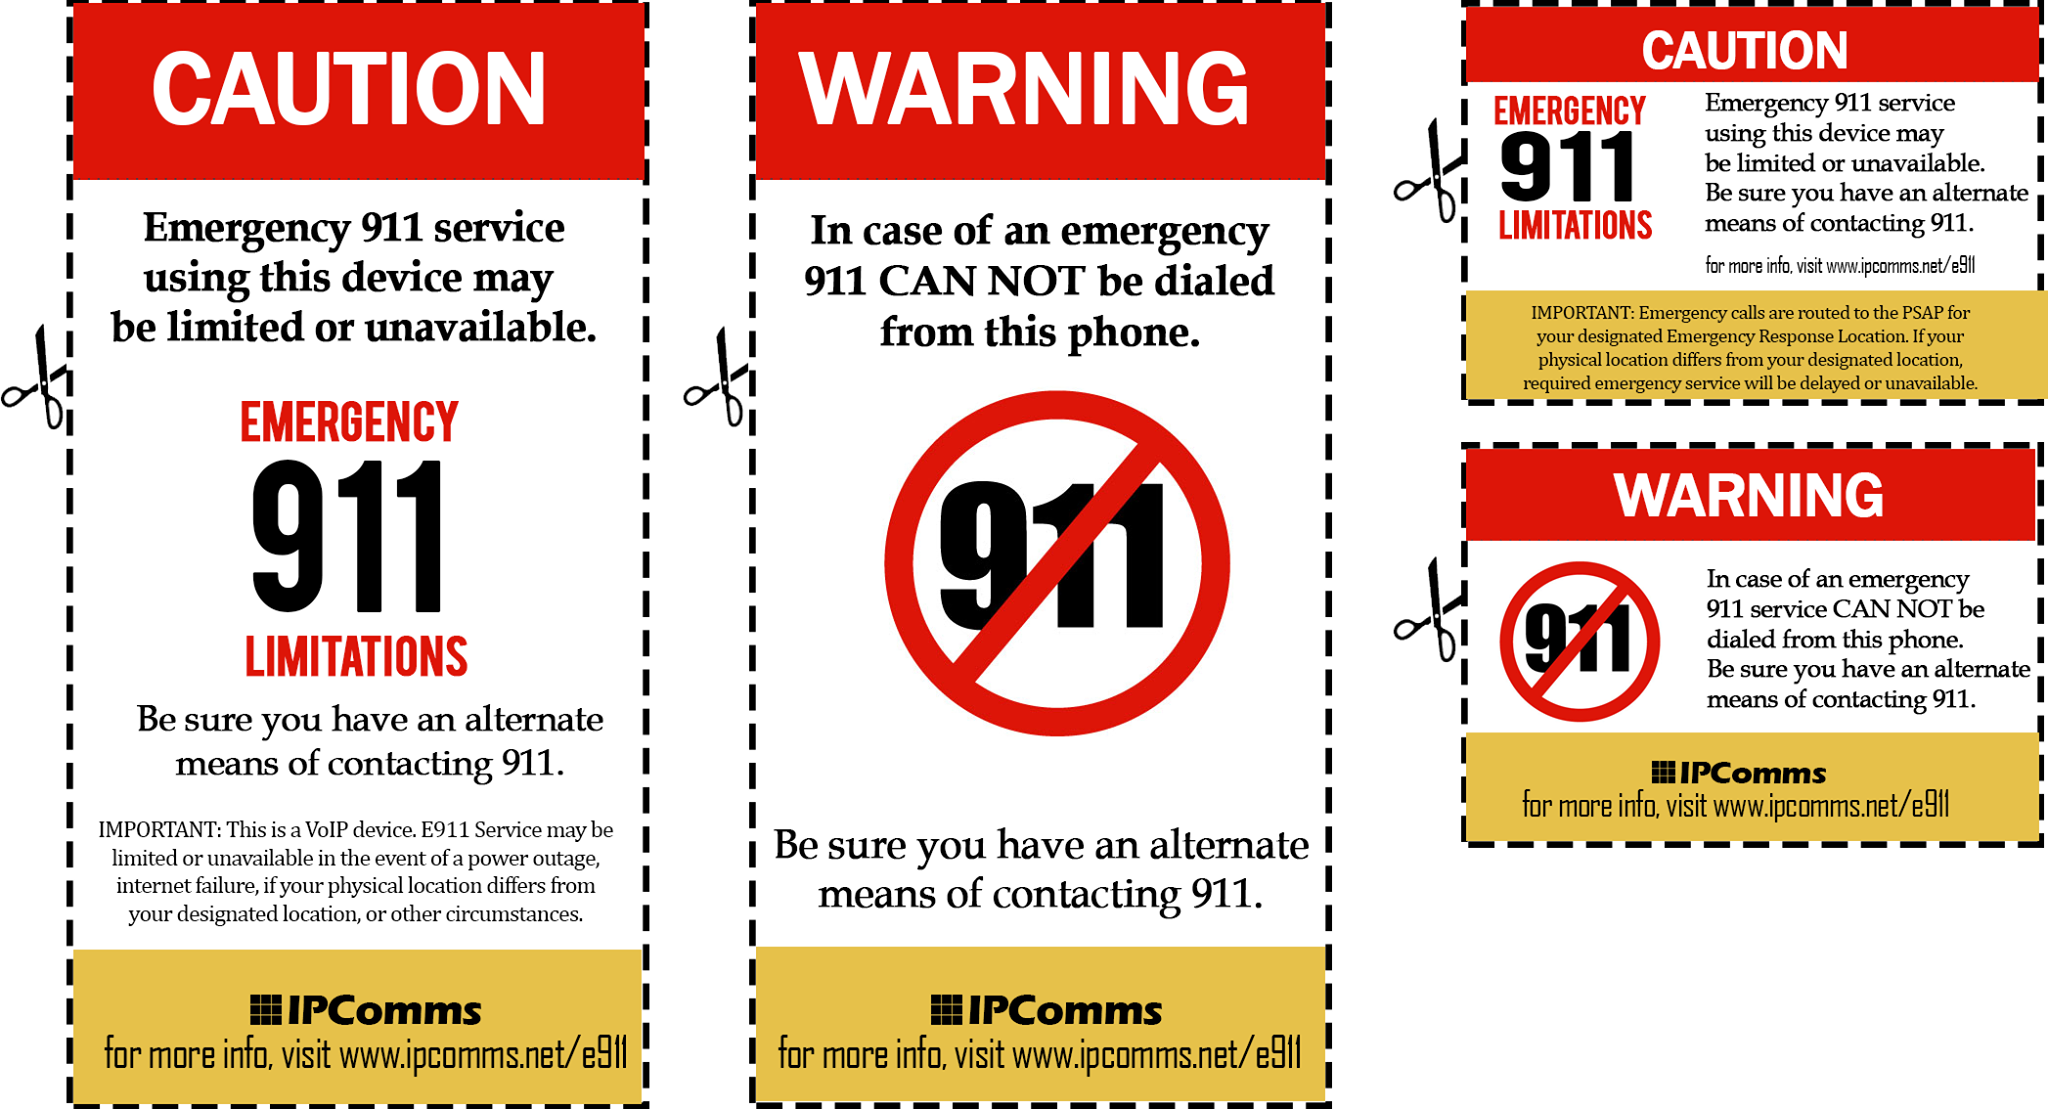
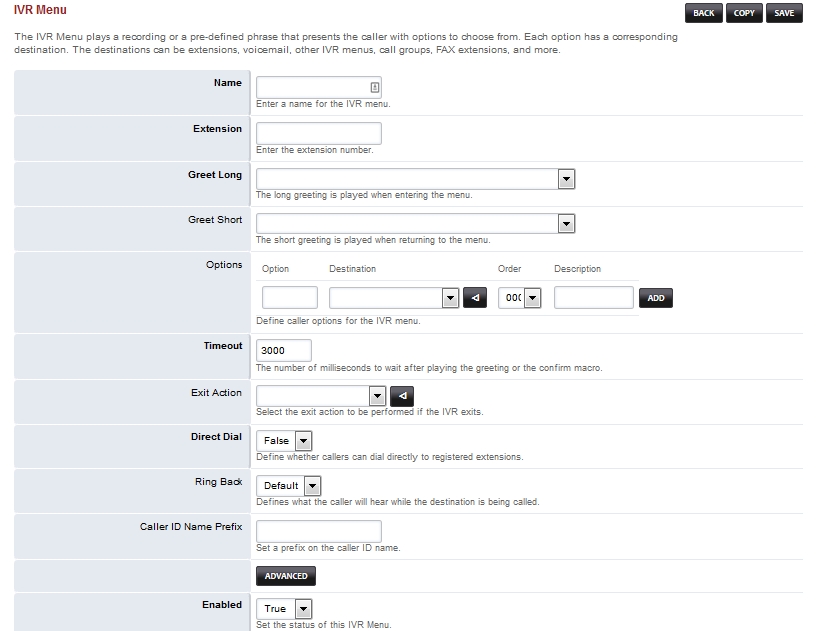
PRI (Primary rate interface) and SIP Trunking are methods of connecting your business phones to the Public Switched Telephone Network (PSTN).


What is a PRI?

PRI trunks have been a long-standing reliable method of connecting business PBX systems to their local phone service provider for decades. It's made up of 23 voice lines with one data line to handle call signaling between the PBX and the service provider. Their reliability has made them the standard in business telephony.  However, technology has finally brought around a solution that can be just as reliable with far more features and cost savings - SIP trunks.

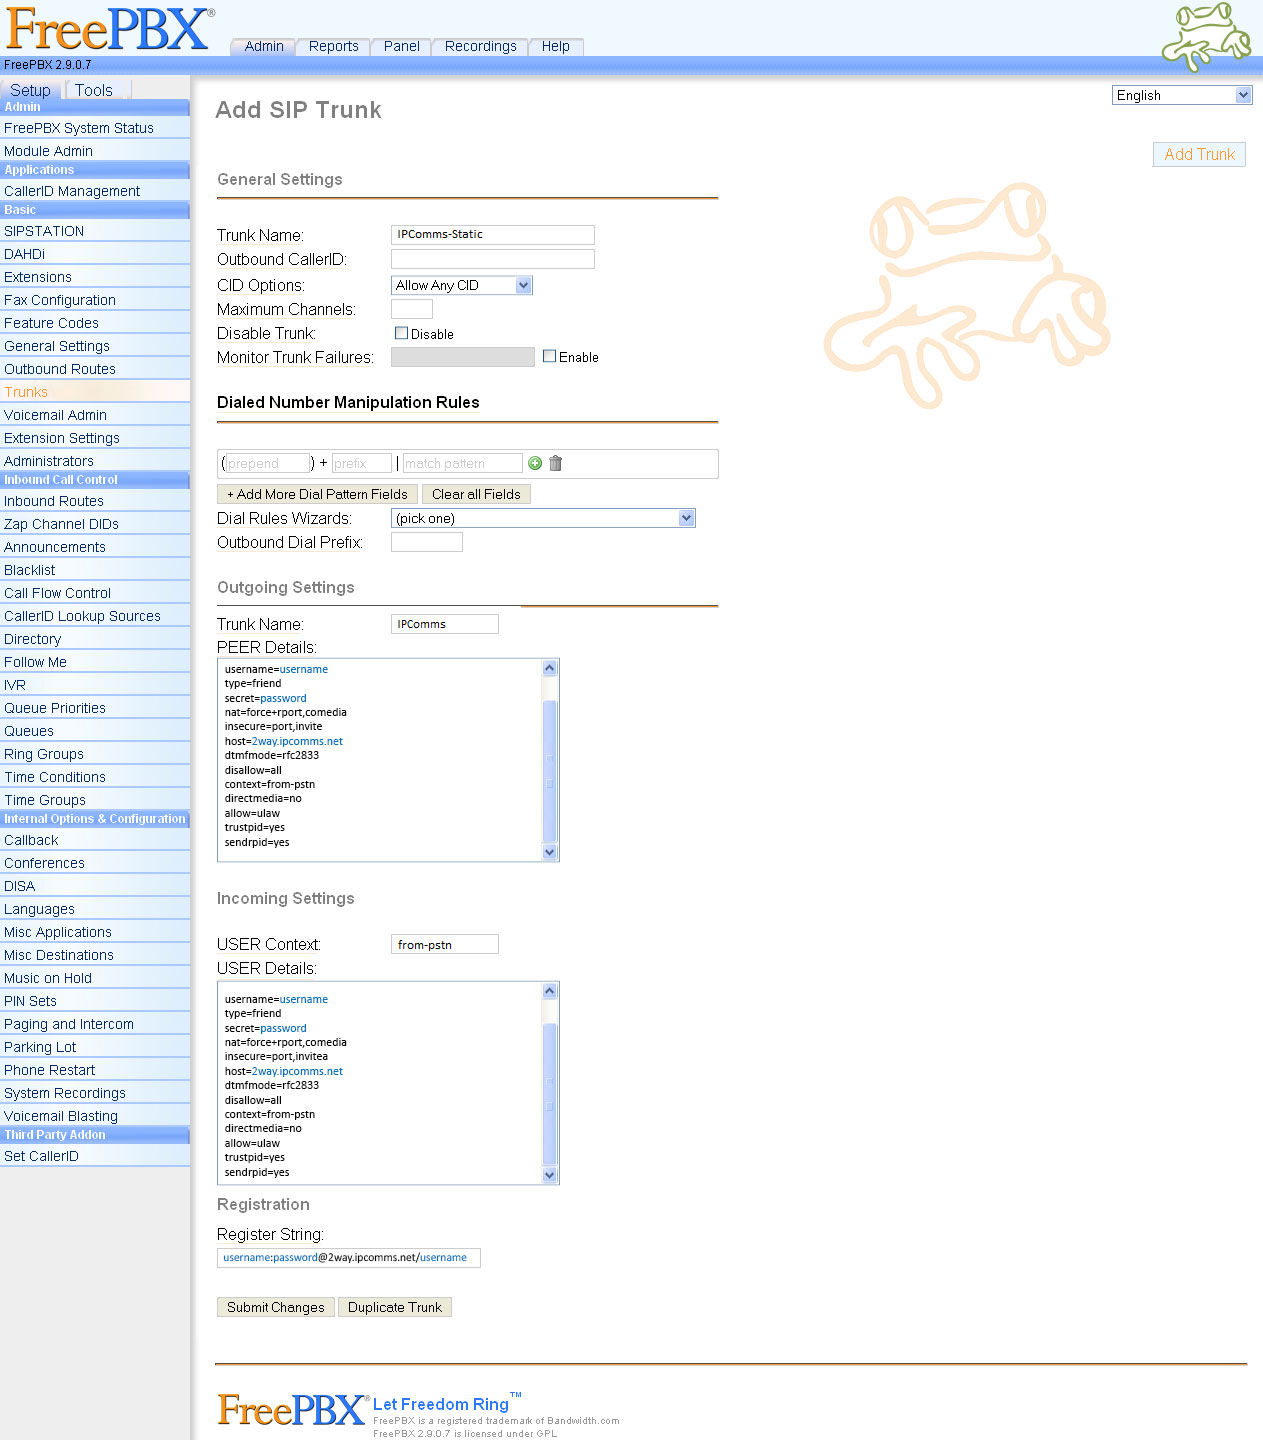
What is a SIP Trunk?

SIP Trunks are telephone line trunks that provide a direct connection between your business and your phone service provider or Internet telephony service provider (ITSP). SIP trunks provide phone numbers, lines, and long-distance typically at much better rates than the traditional PRI providers and with far more flexibility and less (if any) commitment. 

SIP Trunks v.s. PRI

Since PRIs are delivered in bundles of 23 lines each, a business can end up with far more lines than it actually requires.  In contrast, SIP trunks can be delivered with as little as a single line to as many as thousands of lines over a single Internet connection (with enough bandwidth of course), making the financial entry point for SIP trunks far more attractive than its PRI counterpart.  Due to the complexity and resources needed to add lines to a PRI trunk, traditional service providers typically require lengthy service contracts, while SIP trunking providers typically do not require long-term commitments.  This allows businesses that use SIP trunks to shop around for better pricing with different service providers as often as they'd like.  In addition, since PRIs are actual physical lines installed on-premise, ordering new lines requires scheduling with the service provider and a visit by a service technician. SIP trunks, however, are delivered over your existing broadband connection.  Adding lines is fast (if not instantaneous), and doesn't require anything more than a simple phone call or the click of a mouse in most cases.  Removing lines is just as convenient, allowing for even more cost-efficiency.

Transitioning from PRI to SIP Trunks

Making the transition to SIP trunking from PRI doesn't have to be a complicated task.  There are many options that will allow both gradual transitions to SIP trunking or fork-lift solutions for a fresh new start.  The best way to determine what is best for your business is to simply speak with a SIP trunking service provider and ask them what options are available to make the transition as easy and pain-free as possible.  A quality SIP trunking provider like IPComms will be more than familiar with making the transition from PRI to SIP trunking simple to understand and easy to implement.  
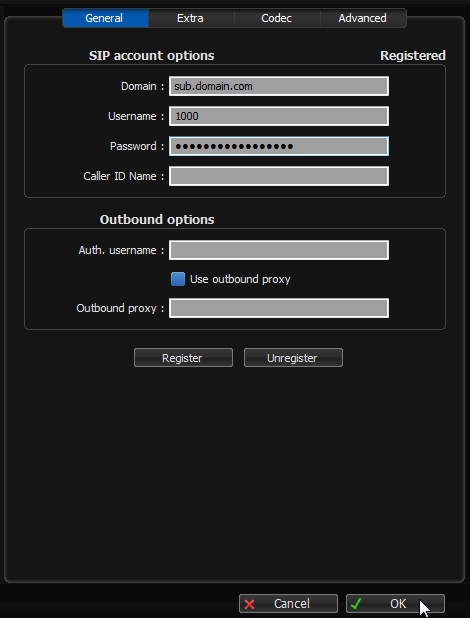
 

Disaster Recovery

Disaster Recovery

Disaster Recovery for VoIP Businesses

Disaster recovery options are vital when implementing business communications.  IPComms provides safeguards to your SIP and VoIP services such as automatic fail-over routing and dynamic load-balancing to ensure your business remains operational even in the event of a disaster or network failure.  These services are provided at no additional cost, and can be the difference between success and failure when it comes to operating a business.


Basic Routing

Most IPComms services are based on basic SIP/VoIP call delivery.  We can deliver calls using a SIP URI or directly to an IP Address (with authentication). 

basicrouting2

PSTN Forwarding

All of our inbound phone numbers can be forwarded to a standard mobile or land-line phone. You can forward your calls to any of your existing phone number (mobile, landline, or PBX). Change your forwarding settings anytime with our online account management system. 

pstnforwarding2

Load-Balancing

With dynamic load-balancing, calls are routed evenly between two endpoints automatically. VoIP calls can be distributed between multiple call centers via SIP trunks or alternatively calls can be routed to a PSTN destination (forwarded to another phone number). Load balancing alleviates calling traffic congestion on a single phone system by automatically routing calls between multiple VoIP endpoints.  Load-balancing is an effective way to manage your call volume and distribution during peak operation times.  

SIP Trunking Load Balancing

Automatic Fail-Over Routing

In the event of a service disruption on the network, our dynamic fail-over solution is designed to redirect voice traffic to a separate business destination automatically. If your primary data connection (such as the Internet or wide area network) fails, traffic is automatically rerouted through to an alternate location that you specify. We can also re-route your calls to a PSTN destination (e.g. mobile phone, P.O.T.S line, home phone etc...) if you wish.  Dynamic fail-over trunking ensures your business communications will continue even if your primary SIP gateway goes down (IP outage, power loss etc...).  

SIP Trunking Fail-Over Routing

Asterisk PBX Support

Connect your open source PBX to our SIP trunks.

IPComms began connecting our SIP trunks to Asterisk® PBXs in 2002. And not to brag, but since then, we've successfully provided over 30,000 SIP/IAX trunks to almost every version of Asterisk on the market.

So, whether you're a forum-surfing, wiki-reading, ISO-burning open source PBX newbie or a full-fledged, Digium® certified, card-carrying member of every Asteriskusers group on the Web... we're sure to be the SIP Trunking service provider you want in your SIP.conf file

Our USA-based support staff is here to help you get your Asterisk PBX connected to our IPComms' SIP trunks. In fact, we'll prove it to you!  Sign up for our Free SIP Trunk Trial and experience our extremely high-quality service and technical support for yourself.  We also have plenty of Asterisk PBX Videos and Asterisk Tutorials available online.

IPComms Emergency 911 Services

IPComms Emergency 911 Services

At IPComms, we make sure that you'll have a reliable way to communicate in case of an emergency. IPComms Emergency 911 Calling service operates differently than traditional 911.  Your safety is very important to us.  So, we require that you fill out a short form during the sign-up process that provides us your physical address (street, city, state, etc...) of where you'll be using our services.

You must register the physical location where you will utilize IPComms phone service for each line and or account that you have with us.  In addition, if you move your VoIP device to another location, you must register your new location.  Be sure to register your new physical location each time you move. If not, any 911 call you make will continue to be sent to the emergency center near your previously registered (old) location. You must register your initial physical location when you subscribe to IPComms' service. 


Remember that IPComms Emergency 911 Calling service will not function in the event of a broadband or power outage, equipment failure, or if your broadband/Internet service or IPComms phone service is terminated.

If you have Emergency Calling (E911) service with IPComms, be sure to display the E911 product limitations stickers on all necessary equipment.  Click the link at the bottom of this page to download these stickers.


Please see our Terms of Service for more information about our Emergency 911 Calling service.

Auto Attendants

Auto Attendants

Auto Attendants allow your calls to be automatically answered for you 24/7, giving you time to focus on your business without having to manage incoming call routing. 


Professionalism & Consistency

Auto Attendants is a flexible and powerful feature that serves as a ‘virtual receptionist’ for incoming callers. Using our Auto Attendant enforces your businesses rules for handling incoming calls.  It also provides a higher level of consistency to your customer's experience when interacting with your business and delivers that same level of quality to all callers flawlessly, regardless of time, day or volume of calls.

How Auto Attendants Work:

  • When callers dial into your business, they’re presented with a custom main greeting. This greeting can be personally recorded by a member of your staff or professionally recorded by one of our voice-over partners.
  • The caller is then presented with options that allow them to reach the appropriate person, department, or extension based on their selections.
  • Once the caller makes their selections, they are placed on-hold. While waiting, callers are presented with on-hold music, product information or even answers to frequently asked questions.
  • While on hold, the system delivers the call to the employee or group of employees best suited to handle the caller's request.  

Time of Day Routing

MyOffice PBX Auto Attendants can manage the routing of your incoming calls differently based on the time of the day, holiday schedules or any other event that might impact your business operations. For example, you might have one auto attendant during business hours that provides options to reach customer service, billing or technical support, while, after business hours, you have another auto attendant that offers voicemail or recorded product information. You can even choose to route emergency calls to the cell phone or home phone of the employee responsible for handling after hours callers.

Custom Voice Prompts for Branding & Sales Promotions

The heart of any business marketing strategy is "branding".  As a business, you know that creating a solid and consistent marketing strategy is everything. An auto attendant is typically your first chance to deliver your company's "pitch" to prospective clients.  With custom greetings, on-hold music, and messages-only extensions, you can take the opportunity to explain your product or service to clients while you have their full, undivided attention.

Online talent resources, like fiverr.com, make it fast and inexpensive to hire professional voice talent to produce creative, quality custom voice prompts. Custom recordings can also be updated continuously to help drive sales and promote new products.

Features

  • Answer multiple phone lines, and transfer calls to the appropriate department or employee 
  • Present callers with a menu of options to choose from (including submenus, if needed)
  • Transfer callers directly into a voice mailbox
  • Play pre-recorded answers to frequently asked questions
  • Play different greetings and offer different sets of options based on time-of-day, day-of-week, or holidays
  • Route calls to mobile phones or cell phones of remote workers

FAQs:

Q. Can I use my own recordings for voice prompts?
A. Yes, you can upload your own voice prompts to customize your auto attendant for your business. 

Q. Can I schedule what time an auto attendant is active for a particular day?
A. Yes, you can define what time frames are active for each day. 

Q. Can I have more than one auto attendant?
A. Yes, you can create multiple auto attendants each with their own options.

I Need My Phone Numbers Ported Now!

When moving your numbers to IPComms, your previous service provider is required by regulations to transfer your numbers. However, there is no requirement that they move quickly! In fact, their probably not going to place you at the top of their priority list. However, there is a way to make the process virtually instantaneous!


Call forwarding is your solution! Most phone service providers will allow you to forward your incoming calls from your number to another. So, when switching from your old provider to IPComms, just get a temporary phone number from us and tell your old service provider to simply forward your calls to that new number. This will omit any downtime and make the porting process virtually transparent.

HOW CAN I USE AN IPCOMMS FREEDID?

HOW CAN I USE AN IPCOMMS FREEDID?

Since a FreeDID is basically a local phone number, they can be used the same way. Here are some examples:

• Receiving wi-fi phone calls - by simply downloading one of many free SIP/VoIP phone applications onto your smartphone, you can use our FreeDID to receive phone calls without using your mobile provider's network. Rather, calls are routed to your phone over your high-speed internet connection.


• Making wi-fi phone calls - since each FreeDID comes with 60 minutes of free domestic outbound calls, you can also make calls using the same free SIP/VoIP phone application.

• VoIP enabled PBXs (IP PBXs) - since our FreeDIDs are delivered using SIP trunking technology, you can easily connect them to any SIP enabled PBX such as Asterisk, 3CX, Trixbox, Elastix and more.

• A second phone line for your smartphone - many of our users use our FreeDIDs as a secondary phone number. This allows them to advertise a different phone number than their personal cell phone number when the need calls for it.

ASTERISK PBX SECURITY TIP #1

ASTERISK PBX SECURITY TIP #1

If you own or operate an Asterisk PBX, trust us, security will be a priority for you... either now or later! If you only do one thing to secure your PBX, take this next piece of advice seriously! What ever you do, no matter how tempting it may be, Never, Never, Never...

... use the default passwords on any PBX. Password security is one of the easiest security measures you can take and by far one of the best ways to stop the top 99% of all hacks as weak password security is easily the most common way hackers enter IP PBX systems.

When installing your IP PBX, the very first step should be to replace both the username and passwords of any account with administrator access. Secondly, when creating user accounts, be sure not to use or allow easy to guess passwords like “1234”, “password”, “companyname1”, extension numbers, etc. Be sure to use strong and unique passwords. This can't be stressed enough.

As tempting and simple as it may be to use your business name with a single digit added to the end of it, don't do it. You would be surprised what these password detectors can figure out with just a little of your business information.

If you need help securing your PBX, contact a member of our technical support team. We'll be happy to help you secure your Asterisk PBX.

Setting up your IAX Trunk inside PBX in a Flash

Setting up your IAX Trunk inside PBX in a Flash

This article will help you setup an IAX2 trunk in your PBX in a Flash system and connect it with IPComms SIP trunks..

PBX in a Flash SIP Trunk Configuration & Security

Start this tutorial after you have completed PBX in a Flash Setup. After Installation, you will need to obtain your IP Address. Once the IP Address has been typed in you will be able to see PBX in a Flash with the Icons: Voicemail & Recordings, Flash Operator Panel, and MeetMe Conference for users, and FreePBX® Administration, Linux Webmin, and Menu Configuration for the Admin user.


Configuration-FreePBX®


FreePBX® is a Registered Trademark of Schmooze Com, Inc.

Before you begin

  1. To begin you will need to enable PBX in a Flash for Admin this is done by clicking on the Users.
  2. Next click the FreePBX Administration this will take you into the GUI of the PBX. The username for a first-time login is maint and the password is what you have entered earlier in the command line of setup.
  3. On the left-hand side, you will see a list of options.
  4. In order to have a softphone registered you will need to setup Trunks, and enter your PEER Details from the email of your registration email. After you have entered the credentials from the email, you can check the registered channels by going to FreePBX System Status then look under Total active channels.
  5. To setup your phone system to make and receive calls, setup Inbound Routes you can create anything for the Description, then use one of your numbers for the DID Number then Set Destination this will be the destination where incoming calls will be routed then select Submit.
  6. Next, we will setup Outbound Routes here you can setup your dialing patterns. This will allow you to make calls to destinations based on rules.
  7. A trunk must be setup in order to make outbound calls. If you have made any changes select Apply Configuration Changes.
  8. If you would like to have all extensions call out as a specific number, that can be set by checking Override Extension this is a useful feature if you want people to call back to one specific number.
    • Any routes that have been created will show up on the right-hand side of the page.
  9. Next, we will setup a SIP Extension, to begin choose type. Next enter information that you would like to have for the desired extension.

This current build of FreePBX has a lot of fail-safe's built into the system, which may give you trouble in the initial setup but will pay off after you have more information in the system. Since we have created an extension, it is time to register the extension with a softphone. Since you have created an extension you can then route calls to that extension.

Queues can be used to help call routing.

If you would like to view more advanced setting to the Tools tab on the top of the control panel without having to go through the command line.

What ports should I forward on my Router to make SIP work?

What ports should I forward on my Router to make SIP work?

SIP uses TCP and UDP protocols to carry its call control information (not the payload) and is usually carried on SIP ports 5060 and 5061. The actual payload is transmitted using the RTP protocol (Real-time Transport Protocol) which is specifically designed to carry payloads that are time-sensitive information such as voice and video.   

RTP has a broad range of ports assigned 16384 - 32767. However different SIP vendors use different ports they may or may not fall within this range.

Here are the ports needed for SIP to work.

• Call control:  Ports 5060 and 5061
RTP audio: Ports 16384 - 32767


Top Three Reasons for SIP One-Way Audio

Top Three Reasons for SIP One-Way Audio

The causes of one-way audio in IP Telephony can be varied, but the root of the problem usually involves IP routing issues. This article takes a look at some of the most common scenarios and solutions that have been experienced by our technicians.


What is one-way call audio?  

Simply put, one-way audio is an issue where a call is placed and either the calling party can't hear the called party or vice versa.  In addition, while not exactly a one-way issue, similar causes can present itself where neither party can hear the other.  One-way audio is a common issue with SIP trunking, and typically pretty easy to fix. So, we've put together a list of the top four reasons for one-way audio with SIP calls.


Why does one-way audio calls happen?

Without getting terribly over technical, here's an overly simplified explanation of how the SIP protocol works.  SIP or session initiation protocol is a set of rules that two VoIP endpoints negotiate under when communicating.  Within this protocol, there are basically two streams of data; call control data and packetized voice (or payload).  Call control procedures regulate things like call setup and tear-down, ringing, routing, and codec selection. As for the actual transportation of the actual voice payload, this information is transported separately from its call control data.  This is an important piece of information to keep in mind when troubleshooting one-way audio. You'll see why shortly.


A little about SIP ports.

While a bit on the technical side, understanding how SIP ports are used will help you to understand why SIP calls can successfully connect and disconnect, but never pass any voice between the two endpoints or only only pass voice successfully in one direction.

Where an IP address is used to identify a specific device, ports are used to access applications within that device (e.g. port 80=http, 23=telnet, etc...). The SIP protocol uses ports.  

SIP uses TCP and UDP protocols to carry its call control information (not the payload) and is usually carried on SIP ports 5060 and 5061. The payload (voice) is transmitted using another 3-letter protocol called RTP or Real-time Transport Protocol and has a broad range of randomly assigned ports within the protocol (typically RTP ports 16384 - 32767). However different SIP vendors use different ports they may or may not fall within this range.


Top 3 reasons for one-way audio in SIP calls.

The causes of one-way audio in IP Telephony can vary, but the root of the problem usually involves IP routing issues or codec negotiation. 


Number 1:  Network Address Translation (NAT)

Network address translation (NAT) is a router function that allows single public Internet accessible IP address to be shared with several devices within the user's private lan (e.g. 192.168.x.x).  The issue with SIP is that the port on which the voice payload is sent is random. The NAT router will typically be able to handle the call signaling traffic but might have no idea what to do with the actual voice packets.   As a result, the audio traffic is not transported correctly and never makes it to the correct SIP endpoint.

Identifying a NAT issue involves checking the SIP control messaging, and looking to see if the private IP address is being used by the SIP endpoint.  Any many cases, the SIP endpoint will send out it's private IP address (192.168.x.x).  As such, the receiving network has no way get back to the sender.

There are several options when it comes to reparing NAT issues:  

Port forwarding

Port forwarding is a simple solution for those who have a single SIP device on their internal LAN. Multiple SIP devices will not work for this basic example.  While these port forwarding steps will vary by router manufacture, the basic idea is the same.  

Begin by configuring your SIP endpoint with a static IP address.  Port forwarding will not work if the IP address is dynamically assigned, as everytime the device reboots, it could get a different IP address, and you will have to reconfigure forwarding on your router.  Next, log into your router/firewall and forward ports 5060 and 5061 to that fixed IP address.  Finally, route RTP audio ports 16384 - 32767 to that fixed IP address.


Using SIP-ALG

Many enterprise firewalls directly support SIP forwarding to both Proxy/PBX devices as well as to/from VoIP phone endpoints using SIP-ALG.  Check to see if your route supports SIP-ALG.  If not, there are many routes available that do.  


Using STUN

Using a STUN, one keeps open ports on the router/firewall so that SIP and RTP messages coming from the Internet reach the VoIP phone. 


(2) Codecs Mismatch

Without getting too deep into the ins and outs of voice compression, Codecs are simply a way of shrinking the size of the voice payload.  Some codecs provide better quality, while other's provide better compression.  When a SIP call is initiated, phones must first agree on which Codec they'll use to for the call.  If the phones cannot agree on a common codec, it's possible that the result could be one-way audio.  IPComms support codec's G.729 and G.711 codec's.  Make sure these Codec's are enabled and available on your PBX or SIP device.


(3) Network Path Out is Different than Network Path In.

Just because you can reach a location on the internet, doesn't mean that the same location can reach you.  If this problem exists, you could end up with one-way audio.  A simple PING and Traceroute tests can determine if there is a network issue in one direction.  Our IPComms tech support staff can assist with these simple and quick tests.  


PBX in a Flash (Resetting the root password)

Resetting a root Password

How to reset a root password in PIAF and generic RHEL(Red Hat Enterprise Linux) based systems.

Having the ability to reset your PIAF password in-case of a lock-out is very vital when it's necessary to keep an open communication. Resetting a password may take a few minutes.

    • Reboot your server
    • When you see the GRUB loader quickly press a key to disrupt the normal booting process

    • Press the letter "e" to edit
    • Highlight the vmlinuz ...Kernel selection and press the "e" to edit

    • On the end of that line, type,"single" to make the server boot in "single-user mode". Then type "b" this boot the system,and the bash prompt will appear.

    • Once the kernel is booted, you should see a command prompt
    • Type "passwd root" to reset your password
    • Reboot as normal and log in using your new password

You can see, there are options to reset other passwords in PIAF from this menu as well.

*This should work on most RHEL-based systems

***Some devices may have SELINUX enabled or enforced, so it may not work if that is the case.

FreePBX EndPoint Manager

EndPoint Manager

EndPoint Manager is a module within FreePBX®, that can be used to install and provision IP phones as well as manage firmware updates. This is a very useful tool that works with the most of the major brands. As an example we will setup a Cisco phone, to begin select Install on Cisco. Next, you will see available models for that brand, select Enable for your current model. Next, go to the Advanced Settings and set the IP Address of the PBX, and set the directory where phones will update the firmware from.


Through the use of this module, you can optimize provisioning, and manage phones without having to physically configure the phones through each GUI interface, or creating multiple configuration files.


FreePBX® is a Registered Trademark of Schmooze Com, Inc.

Setting up your IAX Trunk inside PBX in a Flash/FreePBX

Setting up your IAX Trunk inside PBX in a Flash

  • Setting up a IAX Trunk is very similar to a SIP Trunk, the biggest difference in registration is the Register String. The IAX trunk contains more information than a SIP Trunk. Trunk information can be copied over just like setting up the SIP Trunks
  • Make sure to set the registration string as; username:password@domain
  • If you would like to see if trunks are registered you can go to the FreePBX System Status and look at IP Trunk Registrations.
  • In the SIP Trunk make sure the contact field behind the registration string. The setup for the registration string will be username:password@domain/sipContact(username)
  • After you have created your IAX Trunk you need to modify the Asterisk IAX Settings inside the Tools.
  • Inside here you will be able to make changes to the Codec's, bandwidth control, and multiple other settings.
  • These items will need to be checked if you have any special type of NAT setup inside the firewall or company.
  • Be sure to open up Port 4569 inside your firewall, as well as ports 10,000-20,000 which are mainly for SIP, but IAX uses some of those ports

Trunk Configuration with PBX in a Flash

Today we will be configuring a Trunk for service with IPComms, to begin we simply copy and paste the information from your registration.

  1. After entering your Trunk Configuration information, click Save Changes.
  2. To check any information you have entered simply go to FreePBX System Status, from here you will be able to see any IP Phones and IP Trunks that are online, as well as some other information about your PBX.
  3. Next we setup an Inbound Route this will benefit you if you have multiple numbers, to avoid confusion and slower system speeds talk to IPComms about getting your numbers mapped to your current trunk. Having too many routes setup, or using out of date software could bog down your system.
  4. Next, we will setup the Outbound Routes, this current route is setup to take calls from any number that starts with a US prefix. Here you will also have the option to setup your route to automatically dial the 1, instead of doing it each call. International Routes may also be setup for different trunks.
  5. If you are having audio issues after setting up your routes you should change your NAT Settings. This is done by going to Asterisk SIP Settings in the Tools tab, and enter your IP Address in the External IP location and the Local Networks so they will automatically mask your IP Address.

Configuring Inbound Routes with PBX in a Flash / FreePBX

Inbound routes are very important if you want to have numbers routed to a specific destination(s). With this current setup, if you are calling 6784601475 (DID Number) and you are calling from 7702180222 (CallerID Number) the call will come in as it is setup below with music on hold, signal ringing, and a 3-second pause before it goes to the destination set below (Marcus Cell). If your provider does not provide inbound Caller ID, the Caller ID (CID) Superfecta may be a work around.


This module determines how incoming calls are routed inside your PBX. Rules may be given priority levels so that incoming calls will be routed based on how they are seen coming into the PBX. Be sure to turn off "Anonymous SIP Calling" so that you will be able to receive calls. By setting up Inbound Routes you can have setup a few rules to route to specific destinations, the fewer a number of routes the faster the processor can run a process the calls being made If rules are not set correctly then calls will not hit the PBX correctly, and cause calls to fail.

To setup an inbound route for your IPComms DIDs, follow these steps:

  1. Log on to your FreePBX Administration interface.
  2. Next, select Incoming Routes, then click Add Incoming Route.
  3. Enter a description for this route.
  4. Enter your IPComms DID in the DID Number field.  You must 1 before the number: for example, 16784601475.
  5. Leave the Caller ID Number field blank and leave the rest of the fields alone.
  6. Next, choose a destination for this number: (e.g. Voicemail, Extension, IVR, etc.)
  7. Submit your changes.  Then click Apply Configuration Changes.
  8. Repeat these steps, for each DID that requires a separate route.

NOTE: If you do not have the proper inbound routes configured, FreePBX will connect the call and play the following message, "The number you have dialed is not in service... "

Double check your configureation if you receive this message.


PBX in a Flash, trixbox and Elastix are open-source user interfaces for the management and configuration of Asterisk PBXs. The Asterisk Administration GUI interface can differ depending on which version was chosen. Using the Asterisk Administration Interface you can configure most of Asterisk's features without editing the actual command line configuration files. You can also setup advanced options like call routing, voicemail, and more via the GUI Interface. Below are some examples of common procedures you might require. You can download the Trixbox, Elastix, and PBX in a Flash software directly from their respective websites.

How to Install Asterisk PBX with Ubuntu/Debian (Linux OS)

Below are the steps to building Asterisk PBX on a Debian/Ubuntu Linux OS

The current build was done on Ubuntu 12.04.3 LTS. This should world on Debian Wheezy and Higher.
This is a vanilla install of Asterisk 13, with no Web Interface or extra features.


Let's start by running these commands:

root@asterisk-13-build-ubu~# sudo apt-get update
root@asterisk-13-build-ubu:~# sudo apt-get install build-essential


Build essentials will install the following Packages:

binutils
cpp
cpp-4.6
dpkg-dev
fakeroot
g++
g++-4.6
gcc gcc-4.6
libalgorithm-diff-perl
libalgorithm-diff-xs-perl
libalgorithm-merge-perl
libc-bin
libc-dev-bin
libc6
libc6-dev
libdpkg-perl
libgomp1
libmpc2
libmpfr4
libquadmath0
libstdc++6-4.6-dev
linux-libc-dev
make manpages-dev


You will then install these below packages:

root@asterisk-13-build-ubu:~#
apt-get install –y git-core subversion libjansson-dev sqlite autoconf automake libtools libxml2-dev libncurses5-dev


From here, you are able to download asterisk 13 and compile it.

root@asterisk-13-build-ubu:~# cd /usr/src/
root@asterisk-13-build-ubu:~# wget http://downloads.asterisk.org/pub/telephony/asterisk/asterisk-13-current.tar.gz
root@asterisk-13-build-ubu:~# tar –xzvf asterisk-13-current.tar.gz
root@asterisk-13-build-ubu:~# cd asterisk-13.0.0/
root@asterisk-13-build-ubu:~#./contrib/scripts/install_prereq install ( this will install more packages, a lot of them)
root@asterisk-13-build-ubu:~# ./bootstrap.sh
root@asterisk-13-build-ubu:~# ./configure
root@asterisk-13-build-ubu:~# make && make install
root@asterisk-13-build-ubu:~# make samples
root@asterisk-13-build-ubu:~# sudo make config
root@asterisk-13-build-ubu:~# asterisk


From here, asterisk should already be running and you can log in with this command:

root@asterisk-13-build-ubu:~# asterisk -r


Connected to Asterisk 13.0.0 currently running on asterisk-13-build-ubu (pid = 7459)
asterisk-13-build-ubu*CLI>


Asterisk is Ready.


Connecting SIP trunks with IP Authentication (Asterisk/FreePBX)

IPComms allows two types of SIP trunking when connecting to our network. Our default registration method and by far the most common, is basic SIP Registration.  This method uses a SIP username and password with a registration string to connect to our SIP network.  The second methog, which is less common, but useful in many scenarios, is SIP IP Authentication.  

This article will cover registering your Asterisk PBX to IPComms using SIP IP Authentication.


NOTE: Be careful when editing information within your configuration files. It is best practice to perform a complete back up before modifying settings within your PBX. Any custom configurations may cause you phone system to behave differently than intended.


We'll begin by creating an outbound SIP trunk.

To place outbound calls in Asterisk systems, you will need to create an outbound trunk entry which will route outbound calls to the IPComm's SIP network and also configure how phone numbers will be delivered by configuring your dial plan settings in your extensions.conf file.  This article will walk you through this process.

This sample configuration shows how to add and configure an outbound SIP trunk using the FreePBX front end interface. Most importantly, we will be adding entries into the Peer Details and User Details sections.


 Step-by-step SIP trunk creation:

  • To begin, navigate to the Trunks section of the main menu.
  • From here, you will provide an arbitrary trunk name (you can make this anything you want).
  • Next, you will name your trunk in the Trunk Name field.  (Again, you can name this anything you want to.)
  • Now, you will paste your peer details into the area given.  This information should have been sent to you by IPComms in your provisioning letter.  It should look similar to the sample screenshot given below.
  • Next, you will paste the same information into your user details into the area given.  
  • There will be no registration string as this example is for IP Authentication.  For SIP registration, see our SIP registration example.
  • Finally click Submit Changes, and you are all set.


FreePBX Screenshot -Add SIP Trunk (click to enlarge)

IPAuth FreePBX Config


The next step is to create an outbound route in FreePBX/Asterisk PBX.

The outbound route is used to determine what numbers will be routed to the new Outbound Trunk you just created.  Your specific outbound routing rules might differ, but below is an example of sending 7, 10 and 11 digit phone numbers out of the SIP trunk you just created.  

In this example, we've created 3 entries

  • 1NXXNXXXXXX ....(11-digit dialing)
  • NXXNXXXXXX ....(10-digit dialing)
  • NXXXXXX .... (7-digit dialing)

Then we'll route these calls to our IPComms-Static trunk in the Trunk Sequence for Matched Routes section of our FreePBX/Asterisk PBX outbound route page.


Outbound Routes


IPComms SIP Trunk Registration (Asterisk/FreePBX)

IPComms SIP Trunk Registration (Asterisk/FreePBX)

The first step in making and receiving phone calls using the IPComms SIP trunking network is registering your SIP device to our network using SIP registration. This article will cover registering your Asterisk PBX to IPComms using SIP IP Authentication.


NOTE: Be careful when editing information within your configuration files. It is best practice to perform a complete back up before modifying settings within your PBX. Any custom configurations may cause you phone system to behave differently than intended.


We'll begin by creating a SIP trunk.

SIP registration is the process in which the endpoint sends a SIP REGISTER request to our SIP trunking (the SIP SERVER) to let the server know where it is.  SIP registration requires a SIP username, SIP password, and the SIP server address.  To place and receive calls in Asterisk PBX, you will need to first add a SIP trunk entry which will be used to connect to IPComm's SIP network.   This article will walk you through this process.

This sample configuration shows how to add and configure an IPComms SIP trunk using the FreePBX front end interface. Most importantly, we will be adding entries into the Peer Details and User Details sections.

Note: Alternatively you can choose to connect to IPComms with IP authentication rather than SIP username/password registration.  To enable IP authentication on your IPComms account, contact technical support and request the change.


 Step-by-step SIP trunk creation:

  • To begin, navigate to the Trunks section of the main menu.
  • From here, you will provide an arbitrary trunk name (you can make this anything you want).
  • Next, you will name your trunk in the Trunk Name field.  (Again, you can name this anything you want to.)
  • Now, you will paste your peer details into the area given.  This information should have been sent to you by IPComms in your provisioning letter.  It should look similar to the sample screenshot given below.
  • Next, you will paste the same information into your user details into the area given.  
  • There will be no registration string as this example is for IP Authentication.  For SIP registration, see our SIP registration example.
  • Finally click Submit Changes, and you are all set.


IPComms SIP Trunk Registration - FreePBX/Asterisk -  (click to enlarge)

SIP TRUNK REGISTRATION IPCOMMS FREEDID


To verify that your PBX is registered with IPComms, Click FreePBX System Status on the main menu, and you will see the number of IP Trunk Registrations under the FreePBX Conections section:


FreePBX System Status


The next step is to create an outbound route in FreePBX/Asterisk PBX.

The outbound route is used to determine what numbers will be routed to the new Outbound Trunk you just created.  Your specific outbound routing rules might differ, but below is an example of sending 7, 10 and 11 digit phone numbers out of the SIP trunk you just created.  

In this example, we've created 3 entries

  • 1NXXNXXXXXX ....(11-digit dialing)
  • NXXNXXXXXX ....(10-digit dialing)
  • NXXXXXX .... (7-digit dialing)

Then we'll route these calls to our IPComms-Static trunk in the Trunk Sequence for Matched Routes section of our FreePBX/Asterisk PBX outbound route page.


Outbound Routes


IPComms "Weathers" the 2014 Ice Storm.

IPComms "Weathers" the 2014 Ice Storm.

IPComms "Weathers" the 2014 Ice Storm.

Early January 2014 covered the Southeast in a paralyzing blanket of snow and icy mixture that left the majority of the region frozen, stranded and in the dark.  It proved to be one of the worst storms ever inflicted on the South. The dangerous conditions immobilized Atlanta and surrounding areas which are the home base of IP Communications.  Our primary data center is located on Marietta Street in the heart of Downtown Atlanta and our main office and call center is located North of Atlanta in the nearby city of Kennesaw.


While many surrounding businesses were left stranded and inoperable, IPComms, our network, and most importantly our customers, remained uninterrupted and operational.  This is primarily due to SIP Trunking and its ability to offer a high degree of business continuity and fault tolerance. So, as our city remained in a state of disaster, our network and our staff were able to continue serving thousands of customers without interruption. 

Like our customers, IPComms' data center and network operations center operates on IPComms VoIP network for its internal communications. Because of this, we were able to make use of our own business continuity features such as load-balancing and automatic fail-over.  In addition, our internal PBXs are also based on VoIP technology which is, by nature, ubiquitous - allowing our staff the ability to work remotely as they would in-office.


So, how did we do it?


VoIP phones were taken home.

As the storm approached, IPComms dismissed its staff and they were asked to work from home during the upcoming storm.  Since our office operates on VoIP phones, many of our staff were able to simply take their phone with them and plug into their home broadband connection.  From there, they worked just as they would if they were in our call center.

Mobile Softphones Apps were used.

Other employees simply used their mobile phones to seamlessly continue working from home.  Softphone applications allowed those without VoIP phones to maintain all the business phone functionality just as if they were at their desk.  Callers were unaware that they were working remotely.

Trunks were ready to automatically fail-over to alternative routes.

In case the worst were to happen, our network offers Fail Over Routing which could provide the ability to instantly and automatically redirecting calls to alternate service locations in the event our primary service location experiences an outage or failure.  Thankfully this was not necessary, as our network remained fully operational.


Lesson to be learned?  Preparation pays big!

It's easy to think it will never happen to your business.  But, with all that could happen, it's important to be prepared.  All of IPComms SIP Trunks offer free fail-over routing and load-balancing of calls between multiple office locations. So, with IPComms and a small bit of pre-planning, you can rest assured that your company and it's communications will be able to withstand even the worst of disasters.


#8 Creating an Auto Attendant (IVR)

Auto Attendants allow your calls to be automatically answered for you 24/7, giving you time to focus on your business without having to manage incoming call routing.


Before you begin, these steps will need to have already been completed in order to proceed with IVR creation:

  • You should have already created, uploaded or recorded voice prompts in Step #7.  This is what your callers will hear when they reach the IVR.  
  • You should have already created a few phone extensions that the IVR can route calls to.


1. To begin, go to the IVR menu by clicking on Apps then selecting IVR from the drop-downlist.

../_images/fusionpbx_ivr.jpg


Here you will find the IVR Menu page:  Click the + "plus" sign to create a new IVR menu.

../_images/fusionpbx_ivr1.jpg


2. From here you will fill out the form accordingly.  (Options in bold are mandatory). 


  • Name: Enter a name for the IVR menu

  • Extension: Enter a new extension number.  This must a new extension that isn’t allready created, as it will be used to reach this IVR diretly.

  • Greet Long: The long greeting when entering the menu.

  • Greet Short: The short greeting is played when returning to the menu.

  • Options: Define caller options for the IVR menu.
    For example, if your recording says, "press one for sales" you can route option 1 to the extension of a sales team member or to the sales Ring Group.

  • Timeout: The number of milliseconds to wait after playing the greeting or the confirm macro.

  • Exit Action: Select the exit action to be performed if the ivr exists.

  • Direct Dial: Set to "True".  This defines whether the callers can dial directly to registered extensions.

  • Ring Back: Defines what the caller will hear while the destination is being called.  (This is typically a us-ring tone or a pre-recorded message.)

  • Caller ID Name Prefix: Set a prefix on the caller ID name.

  • Enabled: set the status of the IVR Menu.

../_images/fusionpbx_ivr2.jpg


3. Now create a new inbound Destination.

  • Go to  (Dialplan-> Destination)

  • Click the + (plus) sign to add a new destination

  • Make sure Type is "Inbound", then enter the DID that will be used to reach this IVR from the PSTN (external) into the Destination field.

  • In the Action drop-down field, select the newly created IVR (you should see the name you created in the drop-down list).

  • Then make sure Enabled is "True" and click save.


4. Now if you dial the DID you should get your basic IVR menu. You can then customize the menu with recordings and better options and so on.


Troubleshooting

  • IVR Recording does not play
    • Check that you uploaded a recording that is a 16bit 8khz/16khz mono WAV file.


#7 Creating a Recording

Recordings give you the opportunity to play pre-recorded messages, to your callers.  Once you have a recording made you can use the recordings in different area’s of MyOffice PBX. In order to create a custom Auto Attendant (IVR), we must first create a custom recordings. There are two ways to create a recording.  You can record one via your phone or upload a pre-recorded ".wav" file. 


Recording via phone:

  1. Dial ‘*‘732 and wait for the voice prompt
  2. Enter the password (found in your initial provisioning letter), followed by the pound sign #.
  3. You will be prompted to enter an ID number.  This will be the file name of the recording you just created (e.g. recording100.wav).  Enter at least a 3 digit number.
  4. You can now begin recording your message.  When finished, press the pound key #.
  5. Press 1 to accept and ssave the recording then hang up or press 2 to start over.
 

../_images/fusionpbx_recordings1.jpg


Uploading a Recording

 In the top right corner of the Recordings page (Apps->Recordings), you will find the upload tool.  This will allow you to upload custom pre-recorded messages to your PBX.  Simply click Choose File and browse to the .wav file located on your local device.  Once uploaded, the file will display in the Recorings list below.

(VERY IMPORTANT TIP: You must use .wav files to upload to MyOffice PBX. Mp3 and other formats will upload, but will not work).


recording upload


#6 Creating Your First Ring Group

In this example we'll show you how group extensions together into groups and define a rule for delivering calls to extensions within that group.


What is a ring group?

A ring group (or department) is a list of employee phones that share a similar office function, such as Sales or Service. When a call is made to a group, the caller is first placed on hold while MyOffice PBX begins to "hunt" for someone to answer the call in one of several ways


Adding your first Ring Group

While there are several options for customizing your User Group, for the purposes of this quick start guide, we will create a Ring Group that will have an extension of 200.  Within this ring group, we will add 4 extensions (previously created),  that will all ring at the same time when a call comes in to this Ring Group, or someone dials extension 200 internally.  When any one of the 4 extensions answers the call, all other phones will stop ringing.  

1. Click the + to create a ring group.


ringgroups plus


2. Fill out the required fields below:


  • NAME: Give the Ring Group a name, by entering it in the Name field.  In this example, the group will be called "Sales".

  • EXTENSION: In the Extension box we entered an extension number that is NOT allready created elsewhere in the system (200). This will be the extension of the actual Ring Group.  This will allow internal users to call all phones in this group at the same time by dialing extension 200. This new extention (200) will not show up in the extensions list (Accounts -> Extensions) as it is not a user extension.

  • STRATEGY: The strategy will be Simultaneous.

  • DESTINATIONS: We added 4 extensions that were previously created, and are found in the extensions list (Accounts -> Extensions)  (101, 102,103, 104).


ringgroups setup1


Additional Field Information:


  • Name Simply the meaningful name of the Ring group (shows after the Extension in menu selections).
  • Extension The Dial-able extension for this group standard config states as a 2-7 number extension.
  • Strategy The selectable way in which the destinations are being used.
    • Simultaneous Rings all defined Destinations.
    • Sequence Where order that is lower goes first.
    • Enterprise Works with follow me.
    • Rollover calls destinations in sequence and skips busy destinations.
    • Random A random destination will ring.
  • Destinations The extensions that this ring group applies to.
  • Timeout Destination: The extensions that the call will be forwarded to in case the original destintion times out.
  • Prompt Where you determine if the call must have a dial to confirm before a pickup event.
  • CID Name Prefix The string that is added to the caller ID when it displays on the ringing extension.
  • CID Number Prefix The Number that is added to the caller ID when it displays on the ringing extension.
  • Ring Back What the caller hears when they are waiting for the Destinations to answer.
  • Context The grouping that this ring group will search as specified in the configuration of your Extensions (if this excludes an extension it will not ring)


#4 Setting Up Inbound Destination

Next, we'll show you how to route incoming calls. Setting up an inbound destination determines where an incoming call will go (e.g.extension, IVR Menu, Ring Group, external phone number). 

Before you begin, be sure that you have a DID setup in your IPComms user portal (www.myipcomms.net) and that it is pointing to your PBX (this should have been done for your during signup). Contact IPComms customer service if you have any questions.


Configure Inbound Destinations:

Select Dialplan from the drop-down list and then click Destinations.

../_images/fusionpbx_inboundd.jpg

Click on the

../_images/plus4.png

button on the right.

../_images/fusionpbx_inboundd1.jpg

Make sure Type is "Inbound", then enter your DID number into the Destination field.  

Select where you want your inbound call to be delivered by making a selection in the Action drop-down field.

Then make sure Enabled is "True" and click save.

../_images/fusionpbx_inboundd2.jpg


In the example above, when someone calls the phone number (DID) 555-867-5309, the call will be forwarded to extension 100.

#3 Registering Phones

MyOffice PBX works with most SIP-based phones and other VoIP devices.  In this example, we'll use the free softphone from ZoIPer (Windows version) to register to one of our newly created extensions.


Note Zoiper can be used on several operating systems and mobile devices.

 
  1. Download the software. .. Zoiper: http://www.zoiper.com/
  2. Install the software.
  3. If the software isn’t open click the Zoiper icon to open from the desktop or start menu.

../_images/fusionpbx_zoiper.jpg

 
  1. Click on Settings

../_images/fusionpbx_zoiper1.jpg

 
  1. Click on Preferences

../_images/fusionpbx_zoiper2.jpg

 
  1. Click on Create account

../_images/fusionpbx_zoiper3.jpg

 
  1. Enter the user, password and domain name that you created in step #2 Creating Extensions.
user: 1000
password: thepassword
domain: sub.domain.com
 

../_images/fusionpbx_zoiper4.jpg

 
  1. Click ok. You should have Registered at the top right

../_images/fusionpbx_zoiper5.jpg

 
  • Troubleshooting tips
 
  • Check, double check that the correct extension number and password is being used.
  • Check Fail2ban and see if the ip got blocked.
  • Make sure you have created an DNS A record for the domain being used and there are no typos
  • Nat, firewalls and router settings. Some brands of routers can cause issues. Google the make and model of router or firewall appliance for common settings or remedies.
  • Visit Zoiper Community Supoprt http://community.zoiper.com/

#2 Create Your First Extension

No matter what your plans are for your new PBX, your first step will almost always be to create extensions.  Extensions are basically phones, or other user devices used to receive and make phone calls.  So let's begin creating your first extension.
 

Begin by logging into MyOffice PBX and going to Accounts then click Extensions

../_images/fusionpbx_ext.jpg


From there, click the

../_images/plus3.png

on the right.


../_images/fusionpbx_ext1.jpg


Enter the desired extension number and click save.  Alternatively, if you are creating multiple extensions, you could select how many extensions you wish to create, starting with the "Starting Extension" you entered above by using the "Range" drop-down box. This can be done again later if you need additional extensions.

When finished, click save.  


../_images/fusionpbx_ext2.jpg


We now have extensions. 

../_images/fusionpbx_ext3.jpg

You can customize internal, external, caller id and other options by clicking the edit icon beside each new extension.

../_images/fusionpbx_edit.jpg
 

Here are a list of fields and their function:

 
  • Extenson: This is the extension number or name if used with Number Alias
  • Number Alias: Number extension if extension is a name
  • Password: mouse over to see the password
  • User List: Add a user for this extesnion to login to the FusionPBX GUI interface
  • Voicemail Password: Password for this extensions voicemail
  • Device Provisioning: Used for hardware devices like voip phones and ata’s
  • Account Code: Can be used for billing
  • Effective Caller ID Name: Used for internal caller id
  • Effective Caller ID Number: Used for internal caller id
  • Outbound Caller ID Name: Used for external (public) caller id
  • Outbound Caller ID Number: Used for external (public) caller id
  • Emergency Caller ID Name: Can be set to a national standard or local emergency entity
  • Emergency Caller ID Number: Can be set to a national standard or local emergency entity

../_images/fusionpbx_ext4.jpg

VoIP Fail-over Protection

VoIP Fail-over Protection

Route your calls to a secondary location in case of an emergency.

You never know when disaster will strike. Power failures and internet outages due to weather, construction or natural emergencies are always a possibility.  You hope these events will never occur, but as a business operator, it's important that you make preparations just in case they do.

Putting your business phone system in the Cloud gives your business communications the security it needs.  Unlike traditional phone systems, with PBX fail-over protection, you have the ability to route calls to alternate phones in any location,  in the event of any type of service interruption (e.g. internet outage, power failure, weather, etc.). You can route calls to your mobile phones, phone lines in remote offices, or directly to employee home phones  So rest assured, with MyOffice PBX, your business communications is in good hands.

What is BYOD?

What is BYOD?

Don't throw away those old SIP phones.

In the old days of digital PBX phone systems, most vendors utilized proprietary technology for both hardware and software. This meant that if you purchased a Nortel PBX, you could forget about using your old Lucent phones. So, the decision to change PBX hardware, almost always involved a 100% forklift of the old system, including wiring. This is why, prior to VoIP, most businesses kept their office phone system for life. (Now you know why those PBX closets were always so dusty).


Industry standards have allowed VoIP phones to be sold independently of the PBX system they'll be attached to. In fact, thanks to VoIP technology, the phones are actually not even attached to their controlling phone system. VoIP phones communicate with their host system through the magic of Internet Protocol (the IP in VoIP). Standards like SIP (session initiation protocol) allow for the mixing and matching of PBX systems with virtually any SIP service provider or VoIP phones with virtually any VoIP phone system or Cloud PBX. The same holds true for today's VoIP phones.There are hundreds of VoIP phone vendors. Some specialize in providing the latest in features and functionality, while others concentrate on offering the lowest prices for quality products. This leaves us with options to choose the phones that best suit our particular needs, regardless of what brand PBX they'll be connecting to. Moreover, once we buy these phones, we have the option of taking them with us, if and whenever we choose to switch service providers. This is where BYOD comes in.

In the social world, you might have seen the acronym BYOB on an invitation to let you (the guest) know that the host will not be providing "spirits" at their event and that guests are welcome to bring their own. Well, the technology world, BYOD isn't much different. BYOD stands for Bring Your Own Device and simply means that a service provider is welcoming its customers to bring their own hardware to work with their service.

For example, let's say your previous service provider required that you purchase SIP phones made by Grandstream, and your new service provider offers a BYOD VoIP service. You can take the Grandstream phones with you to your new service provider and connect them to their network (as long as they are compatible with their service). This can save your business a lot of time and money, which makes it a win-win for both the customer and service provider.

Most reputable VoIP service providers have begun providing BYOD offerings. For example, IPComms' SIP Trunking service and Hosted PBX service (MyOffice PBX™) both offer BYOD capabilities, allowing customers to use the hardware they already own as a means to connect to their network and services without having to purchase new VoIP hardware. Needless to say that this drastically reduces your cost of service entry and, in most cases, gives you the ability to connect to your new service provider in minutes rather than days.

So for those of you thinking of making a change from your existing service provider to a new one, remember to ask if your new provider offers a BYOD service. It could save you a lot of time, and even better, a lot of money!


5 Recommended Free Softphones

5 Recommended Free Softphones

Try one, or try them all, they're free!

We frequently are asked by our customers who are in the process of installing or configuring a new PBX system, "which softphones do you recommend?."  While we support most SIP-based softphones available on the market, we do tend to work with some vendors more than others.  

Below is a list of the more popular SIP softphones, all of which are completely free download and use. Choosing the right softphone for your particular needs will depend on many factors, like which operating system you plan to use, what phone features you require, and what PBX system it will be connected to.  

Have a look, download and play around with one or all of them to find the right softphone for your requirements.

.


zperZOIPER

Zoiper runs on a multitude of different platforms: Mac, Linux or Windows, iPhone and Android - with support for both SIP and IAX, and includes free and paid versions of their software. 


csspCSip Simple

CSipSimple is a SIP softphone for Google Android operating system using the Session Initiation Protocol (SIP). It is open source and free software released under the GNU General Public License.


dgswvSwitchvox Softphone for Mobile

Switchvox Softphone app gives you all of the enterprise-class Unified Communications features you expect from Switchvox, now available on the go.


3clogox3CX Softphone

The 3CX softphone for Windows is a free softphone that you can use to make and receive VoIP phone calls from your PC. The advantage of using the 3CX softphone for Windows is that you can leverage low cost or free VoIP calls.


xliteX-lite Counterpath

A very popular SIP softphone supporting a range of codecs and also offering great support for desktop business video conferencing


833 Numbers Released Date Changed

833 Numbers Released Date Changed

The release date for the new toll-free prefix (1-833) has been changed from April 22, 2017, to June 3rd, 2017.  


More Info

A new toll-free prefix will be made available by the Wireline Competition Bureau & Somos (the toll-free number administrator). Shortly you’ll be able to select phone numbers from the newly released 833 toll-free numbers through IPComms. Remember, 833 numbers work just like 800 numbers and every other previously released prefix (888, 877, 866, 855, and 844). This new prefix just means that you now have a lot more choices when it comes to selecting your specific phone number.

This means that vanity phone numbers that may already be taken under older prefixes (e.g. 1-800-FLOWERS) will be made available as 833 numbers. So, if you have some company branding to do and an easy-to-remember toll-free number would be a great addition to your business, the time has come. Reach out to your IPComms' customer care representative for details on how to get that perfect number.

April 22, 2017

New Toll-Free Prefix (1-833)

833 Numbers Available June 3rd, 2017!

On June 3rd, 2017, a new toll-free prefix will be made available by the Wireline Competition Bureau & Somos (the toll-free number administrator). Shortly you’ll be able to select phone numbers from the newly released 833 toll-free numbers through IPComms. Remember, 833 numbers work just like 800 numbers and every other previously released prefix (888, 877, 866, 855, and 844). This new prefix just means that you now have a lot more choices when it comes to selecting your specific phone number.

This means that vanity phone numbers that may already be taken under older prefixes (e.g. 1-800-FLOWERS) will be made available as 833 numbers. So, if you have some company branding to do and an easy-to-remember toll-free number would be a great addition to your business, the time has come. Reach out to your IPComms' customer care representative for details on how to get that perfect number.

What is a Virtual Phone Number?

What is a Virtual Phone Number?

What is a Virtual Phone Number?

We hear this question a lot. What exactly is a virtual phone number, and how are they used? To understand why they're called virtual phone numbers, you must understand the history of regular phone numbers (often called DIDs).

A little background about phone numbers.  Let’s go back a few decades.  In the past, phone numbers were physically assigned to a piece of communications hardware such as an office PBX, voicemail system, or conferencing system.  This required that the local phone company deliver physical phone lines to the office location of the intended equipment. Inbound calls to these numbers were only answered by that hardware at that location.


Jumping forward to the present…

Phone service providers have the ability to deliver phone numbers to virtually any location (get it?  “Virtual”).  Providers of these virtual numbers can either deliver them by simply using something like call forwarding; where an incoming call to that number is just passed on to any predetermined phone line over the traditional public switched phone network (or PSTN for short).  The recipient can notify the provider of which landline phone number they would like their “Virtual” number delivered to, and they provider handles the transfer seamlessly.  While convenient, this method has one major drawback – cost.  While the number can be forwarded to any existing landline number, there is an added cost of delivering calls to a long distance or even more so, an international destination.  However, technology and a few megabits of internet bandwidth can easily solve that problem.

VoIP makes things even better…

The introduction of Voice Over IP, or VoIP, allows calls to be forwarded to the intended destination over any broadband internet connection.  The recipient only needs to have a VoIP phone or VoIP software available on their end to accept the incoming call.  While the technology might be a bit complicated, the concept is rather simple.  Incoming phone calls to the virtual phone number are first routed to the VoIP service provider, where after a bit of VoIP magic, the call is converted to Internet packets where it is then delivered over to the recipient via the internet.  This eliminates the need for physical phone lines from the local phone company; thus drastically lowers the cost of delivery. 

Furthermore, VoIP allows the called party to be physically located virtually (there’s that word again) anywhere, even in another country.  As long as they have access to the public internet, the service provider can locate their VoIP phone and deliver their calls. 

How do I get a virtual phone number?

With IPComms, you simply choose a virtual phone number (or transfer your number to us) and tell us where to forward your calls (mobile, landline, or VoIP). When a call is placed to your number, we'll forward the calls automatically. IPComms maintains a supply of national and global DIDs (virtual phone numbers) from more than 8000 locations, so we are sure to have the number that you need. You can even add multiple DIDs from multiple area codes to project a virtual presence in more than one city.

Learn more about virtual phone numbers

7 Benefits of SIP Trunking

1. SIP trunking can make the most out of your existing non-VoIP PBX hardware.

IPComms SIP trunking is an affordable way to phase your existing PBX hardware into the world of Voice Over IP (VoIP). Simply by adding a VoIP gateway to any legacy PBX, a business can benefit from low-cost incoming and outgoing VoIP calls provided by IPComms.

2. SIP trunks are the best way to get the most out of your IP PBX.

If you already have a VoIP-based business phone system, simply add IPComms SIP trunks and start enjoying quality local and long-distance calls. We support the most popular IP PBXs, such as Asterisk, PBX in a Flash, Avaya, FreePBX, Trixbox, Switchvox, Fonality, Elastix, 3CX, Linksys, Grandstream, TalkSwitch, and Aastra.

Each individual SIP trunk can support a single concurrent call, unlimited inbound calls and either pay-as-you-go outbound or unlimited outbound domestic calling.

3. SIP trunks can expand easily as your business grows.

With SIP Trunking, most services can be enabled within 24 hours of ordering. As your company grows, SIP trunks allow you to increase your network capacity without installing physical landlines - all service additions are delivered seamlessly over your broadband connection.

4. SIP trunks enable communications over multiple geographic locations.

SIP trunks have no geographic limitations - SIP trunks are not installed on site physically. Instead, they are provisioned over your existing broadband internet connection. In contrast, a traditional PRI service is delivered over a T1 copper pair which must physically be brought to your office.

5. SIP trunks provide instant expansion into new markets.

A single corporate SIP trunking connection can provide enough capacity to service any size business from SMB to a large entire enterprise. Multi-site enterprises can use a single SIP trunking account rather than multiple PSTN connections.

6. Save money by combining voice and data across your existing broadband connection.

The typical business uses only a fraction of their overall bandwidth for their data needs, leaving as much as 80% of their available bandwidth underutilized. IPComms' SIP trunks eliminate the need to have both a data and a voice circuit by moving your voice communications onto your existing broadband connection. Best of all, you don't have to sacrifice reliability or quality.

7. SIP trunks are inherently fault-tolerant.

Natural disasters are an ever-looming risk. Unforeseen accidents, fire or even a disgruntled employee can cause catastrophic damage to a business and its revenue. Ensuring business continuity is vital for protecting a business and its assets. VoIP is unique in its design. Its ubiquity and autonomous design allow for a much higher degree of fault tolerance than land-lines or even PRIs.

All of IPComms SIP trunks offer free fail-over routing and load-balancing of calls between multiple office locations. So, with IPComms and a small bit of pre-planning, you can rest assured that your company and its communications will be able to withstand even the worst of disasters.


Leaving Your Service Provider

Leaving Your Service Provider

5 Steps to Transfer Your Phone Number to IPComms

Sure, you and your old carrier had some good times, but you've made up your mind – the love is gone and it's time to take your numbers and move on. However, the separation doesn't have to be nasty or drawn out. What follows are five simple suggestions of things that you can do, in preparation, to ensure that you have a smooth and relatively painless separation from your ex-provider.


Here are some hints to help your transition go a lot smoother. 


1. Call your new (and much better looking) service provider (Verify the number can be transferred):

The first step is simple.Before you do anything, first check to see if your phone number is portable. This will let you know if your new service provider is actually capable of moving it over to their network.

To do this, just provide your new service provider the phone number or group of phone numbers you plan to move. They'll be able to check and to verify its portability. This step alone could save you weeks.


2. Speak with the loser…oops, I mean losing provider (The port-out procedure):

As uncomfortable as it may be, call your future ex-provider and ensure that everything is in place to begin the porting process. Ensure that you don't have any outstanding orders or unpaid invoices that might get in the way or delay the process any more than necessary.Get all the information you'll need to accurately fill out the necessary paperwork.

If you have phone numbers that are assigned to multiple accounts with the losing carrier, you might have to submit multiple porting request documents – one for each account.To be sure, just check with them and ask how they want you to submit the request and be sure to ask for the correct Billing Telephone Number (BTN) for each.


3. Properly complete and sign the "separation papers" (The Letter of Authorization):

Moving phone numbers from one service provider to another is a process that has rules that are strictly enforced by "Big Brother". Understandably so, or anyone could just snatch phone numbers all willy-nilly!

Your new carrier will require that youproperly and accurately complete and return a Letter of Authorization or LOA. This letter will asks for detailed information regarding your existing account with that loser of an ex (carrier that is…).  Your LOA is a vital part of beginning the Local Number Porting (LNP) process.

Be warned, this is where ninety-percent of mistakes are made.Typo's or data entry errors can stop the whole darn thing.Attention to detail is of upmost importance.So, be sure to provide the exact name, service address and billing telephone number (BTN) as it appears on your account.Be sure to include any capitalization, punctuation and/or abbreviations that may be needed.

To help your transfer go as quickly as possible, double… no, triple check your information carefully before you submit your Letter of Authorization to your new carrier. Don't make this separation any harder than it needs to be. 

4.   Be ready to go when the time has come. (The cut-over process):

It's finally time for this whole thing to be over.Your separation paperwork (LOA) has been successfully processed and your new provider has given you confirmation that your transfer will take place at a specific date and at a specific time. If done correctly this process up to this point has taken no more than 15 to 30 days in most cases.

When the pre-arrange date and time arrives, make sure you're ready to leave.Remember, when you leave your old provider, you are, in effect, not their problem anymore.So, the last thing you want to do is make a dramatic exit, walk out, and realize that you forgot something important.Be sure that you plan ahead.

It's also a good idea to go over both your network and hardware to be certain that they are fully prepared to receive calls from your new service provider.Things like firewalls, access lists and NAT translations and even bandwidth capacity can be very easy to forget. It's a good idea to schedule time to test your new connection and configuration with your new provider and make sure everything works well before the cut-over date.

Also keep in mind that some features and/or settings you had with your previous carrier, may not be brought over with your new provider.Features like distinctive ring, voicemail and caller ID blocking will have to be setup again if they're even available at all. Again, this is where testing can certainly come in handy.A little planning goes a long way to ensure that your transfer goes without issue.

5.   Handling and understanding rejections

Even if you do your best, not every number transfer will go smoothly.Numbers can be rejected by your losing provider for any number of reasons.Typically they are not rejected for spiteful reasons, but rather to protect your account or simply in an effort to abide by government regulations (remember Big Brother is always watching!).Here are some of the common rejections you might run into:

  • Authorized name/signature mismatch: This occurs when the name or signature provided on the LOA form doesn't match the name or signature on the losing carrier's account information.
  • Address mismatch: Your address must match exactly.Simple items like leaving the street direction (South, North, SW, NE, etc…) or not putting the street type (Ave, Circle, Lane etc…) can be enough to trigger a rejection.
  • Phone number no found: did you transpose numbers, write the wrong phone number to be transferred down?
  • Pending order on account: if there is an open order for the old account, your transfer could be rejected.Be sure to cancel any pending orders or wait long enough for the order to complete then resubmitting the transfer request.
  • Incorrect Billing Telephone Number (BTN): The BTN is primary phone number used in a service provider's billing system.It is used to identify your account.If numbers are dispersed across several accounts, they could have different BTNs for each. Check with the losing provider to be sure you use the correct BTN.
  • Unsatisfactory Business Relations (UBR): If there are any outstanding bills or payment related issues with the losing carrier, they will reject the transfer request. You'll need to contact the losing carrier and sort out the issues.
 

Remember that the process of moving your phone number from your old service provider to a new one doesn't' have to be nasty.Simple planning and understanding can make your transition much easier and let you move on with your life.Communication is the key.Heck, you might still be friends once it is all over with.You never know! 

Frequently asked questions about the LNP Process.


Cloud PBX for Contractors

Business Phone Service for Mobile Businesses

Whether you’re a painter, roofer, landscaper or remodeler, it’s likely that most of your day is spent working at a job site at, following up on new leads or providing service estimates to potential new clients. All of these daily activities are made possible by the most important tool you own… you cell phone.  Cell phones have all but eliminated the days of running your business from behind a desk. However, as valuable as cell phones have become, they still leave a lot to be desired when it comes to operating a constantly moving business.


Cell phones and even home phones simply don’t have the ability to manage your business communications effectively on their own. The second a customer dials your phone number, they begin evaluating you and your business. Many new sales opportunities have been won or lost in the first few seconds of a phone conversation. So, it’s vital that your business make the best impression possible every single time a customer calls.

MyOffice PBX enables your small business or even not-so-small business to compete on a big-business level, without the big-business cost. This is how it works:

  • Simply choose a local or toll-free number or use your existing phone number.

  • Record a professional main greeting

  • Create departments and assign virtual extensions to employee cell phones

It’s that easy!

Now, when your callers dial in, they’re immediately greeted by a professional custom recording that you specify, something like this:

“Thank you for calling Reliable One Roofing. To schedule an estimate, dial one or to speak with a member of our team please hold the line…” 

Once they’ve made their selection, MyOffice PBX will route the call to the appropriate Virtual Extension – whether it’s a cell, home or office phone. Even if you’re a one-man shop, you can create multiple departments (sales, customer service or billing for example) and have all the calls routed to a single or even multiple cell phones.

With MyOffice PBX, not only can you sound more professional and much more organized, but you can vastly increase the hours in which your business is available to your customers.  With features like automated-attendant, custom greetings and time based rules, you can make your company and its products available to your customers even after business hours.

But that’s just the beginning; we offer even more features like music on hold, voicemail-to-email, call transfer, call recording and much, much more!

So, it’s time to get serious about your business communications and let you customers know that you’re well-organized and well-established by taking advantage of the same phone system features made available to fortune 500 companies at just a fraction of the cost.

MyOffice PBX, your phone system ….in the cloud!


IPComms Partners with Inextrix

IPComms Partners with Inextrix


KENNESAW, GEORGIA —October 8, 2015— IP Communications, LLC. (IPComms), a leading global IP-based service provider of SIP-based local, toll-free & long distance services and Inextrix Technologies Pvt. ltd., a Next Generation IT based company, and project leaders and maintainers of ASTPP, an Open Source VoIP Billing application for Freeswitch®, today announced a technology partnership and integration agreement. The partnership provides users of ASTPP with access to IPComms SIP trunking services, rates and DID configuration from within ASTPP. The partnership also provides IPComms customers with direct access to Inextrix services and support.The partnership also provides IPComms customers with direct access to Inextrix services and support. 


“We are excited about our partnership with Inextrix”, said IPComms' chief executive officer James Doneghy . “We believe integrating IPComms services directly into ASTPP is an added benefit for the open source community.  A large percentage of our customers choose open source VoIP systems like ASTPP as a foundation to their service offering.  This relationship will help simplify and shorten the setup and configuration time for ASTPP system administrators and will also provide easy access to IPComms SIP trunks and phone numbers", said James.

For more information about IPComms' technology partner program please visit http://www.ipcomms.net/partner

ipcomms logo

About IPComms
Based in Kennesaw, Georgia USA (metro Atlanta) and founded in 2002, IP Communications, LLC. (IPComms) is a voice over IP (VoIP) based service provider of local, toll-free and international telecommunications services to SMBs and other VoIP and application service providers.  The company delivers clear, fast and affordable voice communication services to its customers using an all-IP based network infrastructure. It provides quality inbound phone numbers (referred to as direct inward dialing, or DIDs) from more than 8000 rate centers throughout the United States as well as many locations worldwide and enables both businesses and communications services providers to extend the reach of their voice services quickly and more efficiently.  For more information, visit www.ipcomms.net.

inexrix_logo.png

About Inextrix 

iNextrix Technologies was founded in 2010 by two young and dynamic entrepreneurs Mr. Arpit Modi and Mr. Samir Doshi with the goal of to provide the best service and development in the industry at a competitive rate with 100% client satisfaction. Initially, the company was mainly working on VoIP-based technologies and then later, in 2011, adopted more technologies such Web and Mobile development and started building a team of talented and creative resources.

With years of experience in Open Source Softswitch platforms such as Asterisk®, Freeswitch®, Opensips® and Kamailio®, Inextrix uses the knowledge gained to build software applications to enhance these platforms and assist Service Providers in offering carrier grade VoIP services built on open source standards. Their core platform is ASTPP, which is an Open Source VoIP Billing application for Asterisk and Freeswitch. Inextrix provides commercial installations, configurations, support as well as custom applications development. For more information, visit http://www.inextrix.com/.

Note: IPComms, ASTPPInextrixAsteriskFreeswitchOpensips and Kamailio are trademarks of their respective owners.


SIP Trunking or Hosted PBX?

What is SIP trunking?

SIP Trunking provides a business phone system access to the public phone system (PSTN). SIP Trunks allow business to use their existing business phone system rather than forklifting it for a completely VoIP based solution.  Rather than using traditional phone lines physically delivered by the local phone company, a device called a VoIP gateway is connected to the PBXs trunk port and to the public internet.  This allows the existing PBX to be connected to a SIP service provider (like IPComms) where phone services (long distance, direct dial numbers, toll free, etc.) are delivered at cost that is significantly less than traditional phone services.

  In addition, there are additional savings incurred as both voice and data are delivered on the same line.


Many businesses will, of course, already have PBX equipment in place. So, by simply adding SIP Trunking to this existing system, business communications are improved and costs are saved as both voice and data are carried on the same line. This, eliminates the need for any additional lines that may be used to send faxes or access the internet.

A major advantage of using SIP trunking is the ability to grow your capacity without limits and typically in real time.  However, SIP trunks typically lack the ability to deliver more advanced business phone features and relies solely on the existing PBX for most of the more advanced phone features.

What is a Cloud PBX?

whatismyofficepbxpic

Most businesses would much rather dedicate their staff and resources to managing their customers and products rather than waste time maintaining an on-premise hardware-based PBX. A “Cloud” PBX (also known as a hosted PBX), eliminates the cost associated with the purchase of a business phone system hardware.  A Cloud solution delivers all of the advanced phone features and services to its businesses through the internet.  Typically, the only thing need by the business itself are IP enabled phones or PC based softphones.

Cloud PBXs doesn’t require investing in on-premise hardware, so PBX maintenance, software upgrades, power management, and license fees are the sole responsibility of the Cloud PBX service provider rather than the business itself.   requires frequent maintenance—and is constantly and quickly depreciating.  Service is typically activated in minutes rather than days, and the features are typically far more advanced than anything the average small to mid-sized business could afford or manage themselves.

SIP Trunking or Cloud PBX, which is right for my business?

In general, one of the main things to consider when choosing to deploy SIP trunking or a Cloud PBX is going to be whether a business has recently already invested in PBX hardware.  Businesses with no existing PBX solution will benefit far more with a Cloud PBX than with SIP trunking.  Smaller businesses, or businesses without live-in technical staff, typically do not want to bother with purchasing, installing and maintaining the hardware needed to deploy a new phone system.  In addition, businesses with existing phone systems that are severely outdated or require big-business phone features are usually much better off simply deploying a new Cloud based business phone system, rather than investing in upgrading their existing PBX hardware and software.

SIP Trunking, on the other hand, is more suited for organizations are not willing to abandon their existing hardware based PBX equipment for internal or investment reasons.  In some cases, existing PBX hardware might be integral to other business systems (e.g. accounting software, sales tools, marketing systems, etc.).  If a company is simply not in the position to scrap their existing phone system altogether, SIP trunking is better suited as a means to add the benefits and savings of VoIP to their existing PBX equipment and is typically a very quick and easy addition to make.

SIP Trunking & Cloud PBX – A Hybrid solution

Another very common and rather effective way to reap the benefits of VoIP rates and features, even if you have an existing PBX that you have no plans of getting rid of any time soon, is the deployment of both SIP trunking and Cloud based PBX services.  Cloud based systems are relatively inexpensive to deploy even at very small roll-outs.  So, adding a couple of phones with advanced Cloud features to a business that also currently also has a hardware PBX solution might be a great Segway into the Cloud.  Cloud systems can forward calls to your existing PBX, while also enabling advanced features like queuing, call recording, and automated attendants.  It could be the best of both worlds.

As you can see, SIP Trunking and Cloud PBXs have their advantages when properly paired with the right business.  Understanding their strengths and proper fit to one’s business is the best way to get the best solution.  If you need help making this decision, feel free to give us a call. We have years of experience helping businesses like yours through these decisions.  

What is Telecom Fraud?

What is Telecom Fraud?

Plain and Simple.  Telecom fraud is theft!

So, you just received your monthly phone bill from your phone service provider.  What you expect to see is a total somewhere around 30 or 40 bucks.  However, to your amusement, you read "Total Due: $84,534.00" at the bottom of the bill.   After a lengthy conversation with a department that you didn't even know existed until now "The Fraud Management Department" you are informed that the bill is accurate your IP PBX has placed more than 100,000 minutes of outbound calls to Cuba and North Korea.  Furthermore, they want to know when and how you plan to pay.

Unfortunately, the scenario described above is not fictional and in no way exaggerated; more understated if anything.   As with anything connected to the public Internet these days, VoIP-based phone systems

are the ultimate find for internet thieves.  Actually, it is probably more accurate to label this activity as Organized Crime due to the amount of sophistication and organization that is needed to carry out these big hits with so much damage, so quickly.  Telecom fraud has become increasingly more common due to the growing popularity of IP PBXs.  

Unfortunately, this problem is only getting worse and continues to greatly impact VoIP service providers as well as individual businesses that operate through IPPBXs or Hosted Phone Systems. As the cost of ownership of IP PBXs decreases or even becomes free in the case of systems like Asterisk and 3CX, the number of systems being placed on the public Internet also increases.  

How does it happen?

Most commonly, hackers find holes in IPPBXs that are connected to the public internet by using SIP scanners and exploiting system weaknesses.  Typically these are default passwords being left in place, extensions being left unsecured, open SIP ports or incorrectly managed or non-existent of firewalls.  All of which are relatively easy to fix and usually free.  However, security is usually the last thing on the mind of your system integrator or that part-time PBX-Guru/buddy of yours that installed a free version of Asterisk for you (absolutely nothing wrong with Asterisk by the way!).  Once these hackers enter your system, they move quickly.  They operate undetected and terminate as many calls to the most expensive locations possible for as long as it takes for you or your service provider to recognize that your system just passed over a million calls to Cuba and North Korea. Never mind your issues with the State Department, you now have a  $90K+ phone bill on your hands.  And yes, your service provider will expect payment in full!

What is my responsibility?

While your service provider may actively monitor its network for suspicious activity and traffic patterns, it is ultimately the responsibility of the customer to protect their own network.  Customers are responsible for all charges associated with their account whether fraudulent or not. It is the customer’s sole responsibility to take immediate action to prevent or block any fraudulent use.  As the IP PBX owner, you are responsible for the security and administration of your phone system.  This includes both physical security of the system and phones, as well as passwords, pins, remote users and network security.  Your service provider may have systems in place to help detect and notify you of hacking attempts and fraud as a courtesy, but you are responsible for any charges incurred.

What can I do to protect my business?

It is not an impossible task to secure your IP PBX from the top 99.9% of all intrusion attempts and minimize the damage done by any intruder that sneaks past your security.  Remember, Hackers are lazy (otherwise they'd have a real Job!), they are not going to spend hours trying to hack a system when they can just move on to another that is wide-open.


Summary:

Here are some easy to implement procedures to help protect your IP IPBX from intruders:

Be sure that your IP PBX and your network is secure and limited only to those with appropriate access permissions.

Never, never, never use the default passwords on any system.

Never use the same Username and password on your extensions.

Place your PBX behind a firewall

Make it private – Nat is your friend!

Keep inbound and outbound routing separate (asterisk)

Limit registration by extensions to your local subnet.

Disable channels and services that are not in use

Make it harder for SIP scanners

Limit and restrict routing and phone number dial plans

Audit your system security regularly

For a complete list of security steps, please see (11 steps to secure your IP PBX).


11 Steps to Secure your PBX

11 Steps to Secure your PBX


Don't be a victim of telecom theft

If you are reading this, you're probably like most of us... after many hours, or even several days of downloading software, setting up servers, configuring trunks, and cracking open firewall ports, you finally achieve success - your PBX is working, and calls are passing.   So, you wipe the sweat from your forehead, push away your ergonomic mesh-backed office chair (with lumbar support), and walk away pleased - not giving a second thought to security.  Until one day, you log into your PBX and see the skull-and-boned call sign of a hacker that has decided to pay you’re perfectly running PBX a visit. 


As a SIP trunking provider, our support team at IPComms sees this very scenario much more than we’d like to.  For those PBX owners who are lucky, they’re only faced with hours of downtime and a complete system rebuild.  However, unlike getting your personal computer hacked, getting hacked into your business PBX, gives the unscrupulous instant access into your virtual wallet via what is known as toll fraud.

Using toll fraud, a well-informed hacker can siphon thousands of dollars in as little as one night while you sleep blissfully.  With heavy volumes of wholesale phone traffic at the ready, a single hacked PBX can transmit thousands of minutes worth of phone calls to destinations with calling rates as high as five bucks a minute or more!  

Scared yet?  Well, you should be, especially, if you have just downloaded, installed and SIP "trunked" your new Asterisk PBX server without implementing even basic Asterisk PBX security.  Trust us, it's not a question of if your PBX will be hacked, it's just a matter of how long it will be before it happens!  So, why not take a few minutes and finish your Asterisk PBX installation by performing some relatively simple PBX security; that could pay off big in the long run? Ever heard the old adage, "An ounce of prevention is worth a pound of cure"?  Well, that author was undoubtedly referring to PBX security! 

PBX security - is not rocket science

Hopefully, you’re here proactively, and not after the damage has been done.  But, if not, at least you have learned your lesson and plan to do things right this time.

While PBX security, like most other security, requires constant attention and is a continuous work-in-progress, there are some basic common-sense steps that you can perform that will safeguard your system from the most common of attacks. 

As mentioned in our “What is Telecom Fraud” blog, most hackers are not looking for a long drawn out hack and would much rather move on to easier targets if you would only put up a little fight.  So we’ve put together a list of “11 steps to secure your Asterisk® PBX”.  While this list speaks directly to Asterisk PBX owners, many of the steps can easily be carried over to most other IP PBX (VoIP) manufacturers.


Here are the 11 Steps to Secure your Asterisk PBX

  1. Physically secure your IP PBX and network hardware.
    Physical security is critical and commonly overlooked. Be sure access to your hardware is limited to only those with appropriate access permissions, actually require access, and most importantly, know what they are doing!  We tech's like to play around with stuff, but that's why we have labs.

  2. Never, Never, Never use the default passwords on any system. (Use Strong Passwords)
    If you are truly concerned about PBX security, you will take this one piece of advice seriously!  Password security is easy and by far the best way to stop the top 99% of all hacks as it is easily the most common way hackers enter IP PBX systems.

    When installing your IP PBX, the very first step should be to replace both the username and passwords of any account with administrator access. Secondly, when creating user accounts, be sure not to use or allow easy to guess passwords like “1234”, “password”, “companyname1” etc.  

    Also, be sure to use a strong and unique password.  This can't be stressed enough.  As tempting and simple as it may be to use your business name with a single digit added to the end of it, don't do it.  You would be surprised what these password detectors can figure out with just a little information. 

  3. Never use the same username and password on your extensions.
    This is another VERY common issue, especially within the Asterisk community.  Using password 101 for extension 101 is asking for big trouble.  DON’T DO IT!

    An example of what NOT to do on your extensions: 
    ; sip.conf  
    [101] 
    username=101 
    secret=101
    host=dynamic 

  4. Place your PBX behind a firewall
    Lets’s face it, working on your PBX from home or allowing co-workers access to the system remotely is necessary and often unavoidable.  However, doing it correctly can be the difference between security success and total and utter failure.  VPNs are a good way to limit access and enable co-worker remote management. Placing your PBX behind a firewall and Restrict remote access to your IP PBX to specific IP Address will greatly discourage even the most determined hacker.  While hardware firewalls typically provide the most security, software firewalls can be just as effective and much cheaper (many are free).   

    Firewalls, of course, are only as good as the rules defined within them.  So be sure to only activate ports that are absolutely essential to run your PBX. Block anonymous WAN requests (P-I-N-G).  Let's face it; if they can find you, they can hack you.

    When possible, place your IP PBX on a LAN with Network Address Translation (NAT).  NAT basically gives your IP PBX a private IP Address and makes it much more difficult to gain access to from the internet.  While it may be easy to simply disable NAT for simplicity (especially when you run into that pesky one-way audio issue, don't do it.  Take the time to set it up correctly, and you'll be glad you did.

  5. Use the “permit=” and “deny=” lines in sip.conf
    Use the “permit=” and “deny=” lines in sip.conf to only allow a small range of IP addresses access to extension/user in your sip.conf file. This is true even if you decide to allow inbound calls from “anywhere” (default), it won't let those users reach any authenticated elements!

  6. Keep inbound and outbound routing separate (asterisk)
    This is probably the biggest cause and source of toll fraud.  By keeping your inbound call routing in a different context than your outbound routing, if an intruder does happen to make it into your system, he can’t get back out again.  

  7. Limit registration by extensions to your local subnet.
    Restrict the IP addresses your extensions can register onto the local subnet.  Asterisk PBXs can use the ACL (permit/deny) in SIP.conf to block IP addresses.  This can fend of brute force registration attempts.


  8. Disable channels and services that are not in use
    Disable channels that you aren’t using like skinny and MGCP.  For Asterisk PBXs, you can “unload” these modules in the /etc/modules.conf file like this:

    noload => chan_mgcp.so
    noload => chan_skinny.so 
    noload => chan_oss.so

  9. Make it harder for sip scanners (Set “alwaysauthreject=yes” )
    Set “alwaysauthreject=yes” in your sip configuration file. What this does is prevent Asterisk from telling a sip scanner which extensions are valid by rejecting authentication requests on existing usernames with the same rejection details as with nonexistent usernames.  If they can't find you they can't hack you!

    Another way to make it hard for SIP scanners is to install a SIP port firewall.  This will block “scanning” of port 5060 and 5061 and can disable the attempting endpoint for a specific time when it detects a violation.


  10. Limit and restrict routing and phone number dial plans
    Restrict calling to high-cost calling destination and don’t allow calling to 0900 + Premium numbers)

  11. Audit your system security regularly
    Once you’ve reached this point, it's not a bad idea to put your Hacker hat on, and have a try at your own system.  Think like a hacker and try to look for weaknesses or holes in your system security.  It is a good idea to review your system security regularly.  Don’t sleep on security… you can guaranty that thieves aren’t.

The above steps mainly focus on PBX calling and traffic security and do not cover topics related to software protection (e.g. protection against Spyware, Trojans or viruses).   These are also very important and should also be taken into consideration when securing & protecting your PBX.

Did you know...

By switching to a cloud-based PBX service, you can make the 11 steps to secure your IP PBX someone else's responsibility.  Learn more about cloud-based PBX services.


Setting this to “yes” will reject bad authentication requests on valid usernames with the same rejection information as with invalid usernames,