#8 Creating an Auto Attendant (IVR)

Auto Attendants allow your calls to be automatically answered for you 24/7, giving you time to focus on your business without having to manage incoming call routing.


Before you begin, these steps will need to have already been completed in order to proceed with IVR creation:

  • You should have already created, uploaded or recorded voice prompts in Step #7.  This is what your callers will hear when they reach the IVR.  
  • You should have already created a few phone extensions that the IVR can route calls to.


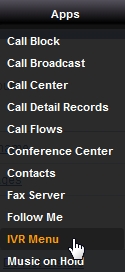
1. To begin, go to the IVR menu by clicking on Apps then selecting IVR from the drop-downlist.

../_images/fusionpbx_ivr.jpg


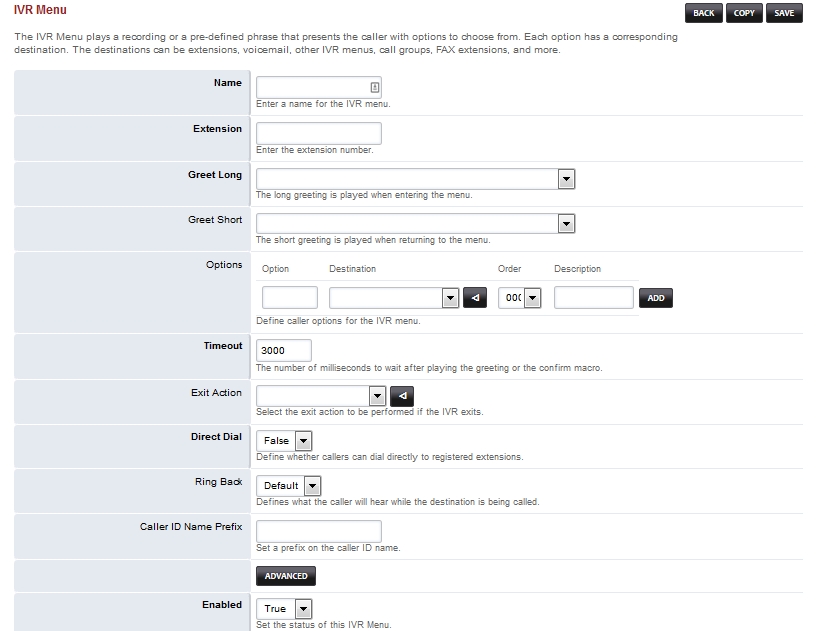
Here you will find the IVR Menu page:  Click the + "plus" sign to create a new IVR menu.

../_images/fusionpbx_ivr1.jpg


2. From here you will fill out the form accordingly.  (Options in bold are mandatory). 


  • Name: Enter a name for the IVR menu

  • Extension: Enter a new extension number.  This must a new extension that isn’t allready created, as it will be used to reach this IVR diretly.

  • Greet Long: The long greeting when entering the menu.

  • Greet Short: The short greeting is played when returning to the menu.

  • Options: Define caller options for the IVR menu.
    For example, if your recording says, "press one for sales" you can route option 1 to the extension of a sales team member or to the sales Ring Group.

  • Timeout: The number of milliseconds to wait after playing the greeting or the confirm macro.

  • Exit Action: Select the exit action to be performed if the ivr exists.

  • Direct Dial: Set to "True".  This defines whether the callers can dial directly to registered extensions.

  • Ring Back: Defines what the caller will hear while the destination is being called.  (This is typically a us-ring tone or a pre-recorded message.)

  • Caller ID Name Prefix: Set a prefix on the caller ID name.

  • Enabled: set the status of the IVR Menu.

../_images/fusionpbx_ivr2.jpg


3. Now create a new inbound Destination.

  • Go to  (Dialplan-> Destination)

  • Click the + (plus) sign to add a new destination

  • Make sure Type is "Inbound", then enter the DID that will be used to reach this IVR from the PSTN (external) into the Destination field.

  • In the Action drop-down field, select the newly created IVR (you should see the name you created in the drop-down list).

  • Then make sure Enabled is "True" and click save.


4. Now if you dial the DID you should get your basic IVR menu. You can then customize the menu with recordings and better options and so on.


Troubleshooting

  • IVR Recording does not play
    • Check that you uploaded a recording that is a 16bit 8khz/16khz mono WAV file.


#7 Creating a Recording

Recordings give you the opportunity to play pre-recorded messages, to your callers.  Once you have a recording made you can use the recordings in different area’s of MyOffice PBX. In order to create a custom Auto Attendant (IVR), we must first create a custom recordings. There are two ways to create a recording.  You can record one via your phone or upload a pre-recorded ".wav" file. 


Recording via phone:

  1. Dial ‘*‘732 and wait for the voice prompt
  2. Enter the password (found in your initial provisioning letter), followed by the pound sign #.
  3. You will be prompted to enter an ID number.  This will be the file name of the recording you just created (e.g. recording100.wav).  Enter at least a 3 digit number.
  4. You can now begin recording your message.  When finished, press the pound key #.
  5. Press 1 to accept and ssave the recording then hang up or press 2 to start over.
 

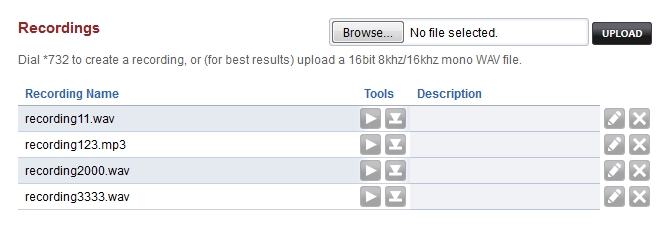
../_images/fusionpbx_recordings1.jpg


Uploading a Recording

 In the top right corner of the Recordings page (Apps->Recordings), you will find the upload tool.  This will allow you to upload custom pre-recorded messages to your PBX.  Simply click Choose File and browse to the .wav file located on your local device.  Once uploaded, the file will display in the Recorings list below.

(VERY IMPORTANT TIP: You must use .wav files to upload to MyOffice PBX. Mp3 and other formats will upload, but will not work).


recording upload


#6 Creating Your First Ring Group

In this example we'll show you how group extensions together into groups and define a rule for delivering calls to extensions within that group.


What is a ring group?

A ring group (or department) is a list of employee phones that share a similar office function, such as Sales or Service. When a call is made to a group, the caller is first placed on hold while MyOffice PBX begins to "hunt" for someone to answer the call in one of several ways


Adding your first Ring Group

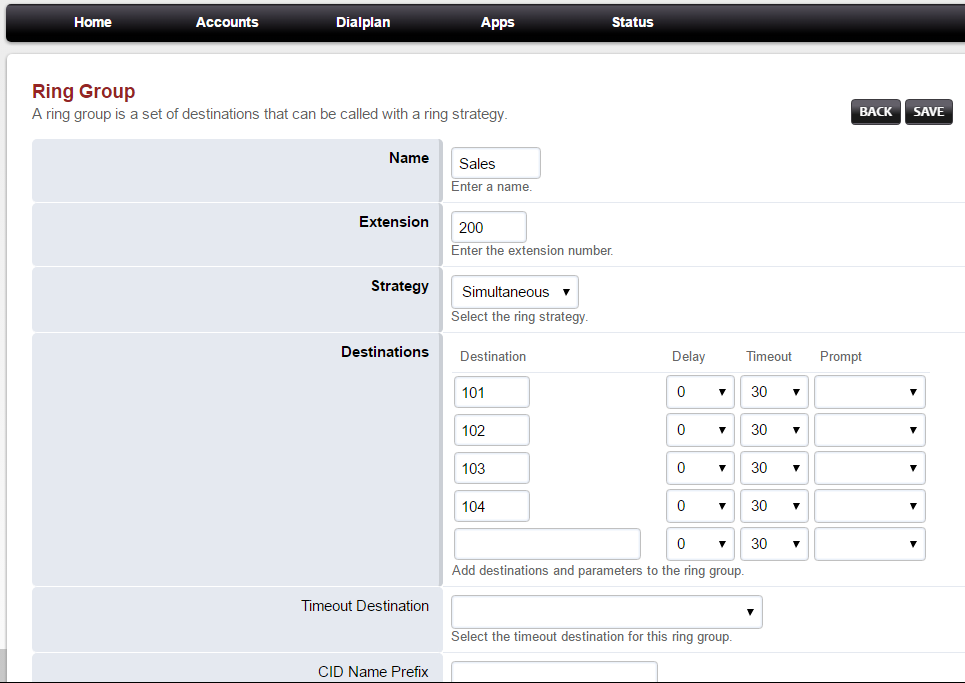
While there are several options for customizing your User Group, for the purposes of this quick start guide, we will create a Ring Group that will have an extension of 200.  Within this ring group, we will add 4 extensions (previously created),  that will all ring at the same time when a call comes in to this Ring Group, or someone dials extension 200 internally.  When any one of the 4 extensions answers the call, all other phones will stop ringing.  

1. Click the + to create a ring group.


ringgroups plus


2. Fill out the required fields below:


  • NAME: Give the Ring Group a name, by entering it in the Name field.  In this example, the group will be called "Sales".

  • EXTENSION: In the Extension box we entered an extension number that is NOT allready created elsewhere in the system (200). This will be the extension of the actual Ring Group.  This will allow internal users to call all phones in this group at the same time by dialing extension 200. This new extention (200) will not show up in the extensions list (Accounts -> Extensions) as it is not a user extension.

  • STRATEGY: The strategy will be Simultaneous.

  • DESTINATIONS: We added 4 extensions that were previously created, and are found in the extensions list (Accounts -> Extensions)  (101, 102,103, 104).


ringgroups setup1


Additional Field Information:


  • Name Simply the meaningful name of the Ring group (shows after the Extension in menu selections).
  • Extension The Dial-able extension for this group standard config states as a 2-7 number extension.
  • Strategy The selectable way in which the destinations are being used.
    • Simultaneous Rings all defined Destinations.
    • Sequence Where order that is lower goes first.
    • Enterprise Works with follow me.
    • Rollover calls destinations in sequence and skips busy destinations.
    • Random A random destination will ring.
  • Destinations The extensions that this ring group applies to.
  • Timeout Destination: The extensions that the call will be forwarded to in case the original destintion times out.
  • Prompt Where you determine if the call must have a dial to confirm before a pickup event.
  • CID Name Prefix The string that is added to the caller ID when it displays on the ringing extension.
  • CID Number Prefix The Number that is added to the caller ID when it displays on the ringing extension.
  • Ring Back What the caller hears when they are waiting for the Destinations to answer.
  • Context The grouping that this ring group will search as specified in the configuration of your Extensions (if this excludes an extension it will not ring)


#4 Setting Up Inbound Destination

Next, we'll show you how to route incoming calls. Setting up an inbound destination determines where an incoming call will go (e.g.extension, IVR Menu, Ring Group, external phone number). 

Before you begin, be sure that you have a DID setup in your IPComms user portal (www.myipcomms.net) and that it is pointing to your PBX (this should have been done for your during signup). Contact IPComms customer service if you have any questions.


Configure Inbound Destinations:

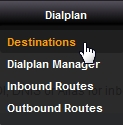
Select Dialplan from the drop-down list and then click Destinations.

../_images/fusionpbx_inboundd.jpg

Click on the

../_images/plus4.png

button on the right.

../_images/fusionpbx_inboundd1.jpg

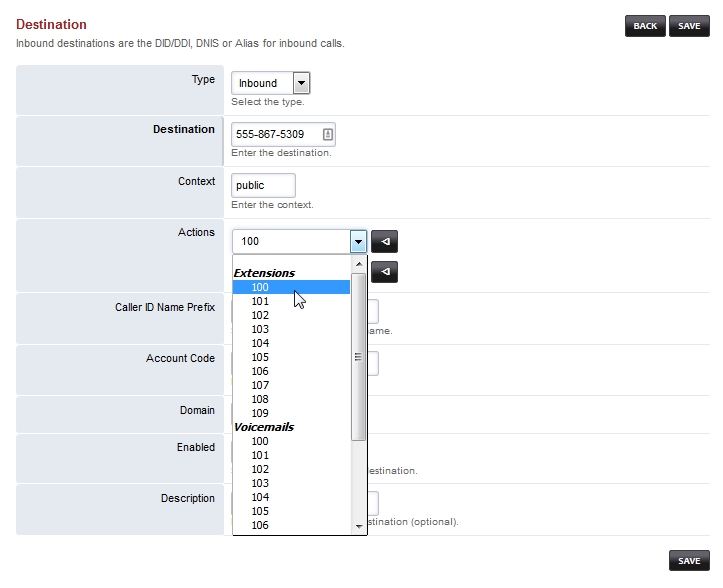
Make sure Type is "Inbound", then enter your DID number into the Destination field.  

Select where you want your inbound call to be delivered by making a selection in the Action drop-down field.

Then make sure Enabled is "True" and click save.

../_images/fusionpbx_inboundd2.jpg


In the example above, when someone calls the phone number (DID) 555-867-5309, the call will be forwarded to extension 100.

#3 Registering Phones

MyOffice PBX works with most SIP-based phones and other VoIP devices.  In this example, we'll use the free softphone from ZoIPer (Windows version) to register to one of our newly created extensions.


Note Zoiper can be used on several operating systems and mobile devices.

 
  1. Download the software. .. Zoiper: http://www.zoiper.com/
  2. Install the software.
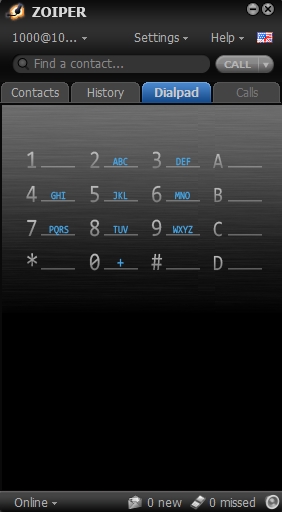
  3. If the software isn’t open click the Zoiper icon to open from the desktop or start menu.

../_images/fusionpbx_zoiper.jpg

 
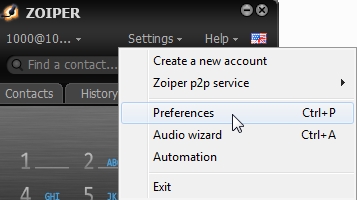
  1. Click on Settings

../_images/fusionpbx_zoiper1.jpg

 
  1. Click on Preferences

../_images/fusionpbx_zoiper2.jpg

 
  1. Click on Create account

../_images/fusionpbx_zoiper3.jpg

 
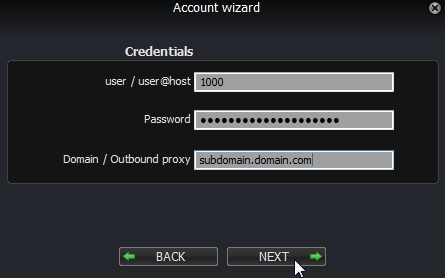
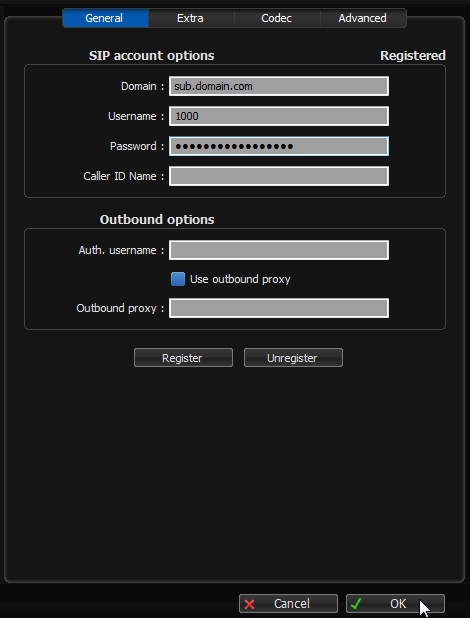
  1. Enter the user, password and domain name that you created in step #2 Creating Extensions.
user: 1000
password: thepassword
domain: sub.domain.com
 

../_images/fusionpbx_zoiper4.jpg

 
  1. Click ok. You should have Registered at the top right

../_images/fusionpbx_zoiper5.jpg

 
  • Troubleshooting tips
 
  • Check, double check that the correct extension number and password is being used.
  • Check Fail2ban and see if the ip got blocked.
  • Make sure you have created an DNS A record for the domain being used and there are no typos
  • Nat, firewalls and router settings. Some brands of routers can cause issues. Google the make and model of router or firewall appliance for common settings or remedies.
  • Visit Zoiper Community Supoprt http://community.zoiper.com/

#2 Create Your First Extension

No matter what your plans are for your new PBX, your first step will almost always be to create extensions.  Extensions are basically phones, or other user devices used to receive and make phone calls.  So let's begin creating your first extension.
 

Begin by logging into MyOffice PBX and going to Accounts then click Extensions

../_images/fusionpbx_ext.jpg


From there, click the

../_images/plus3.png

on the right.


../_images/fusionpbx_ext1.jpg


Enter the desired extension number and click save.  Alternatively, if you are creating multiple extensions, you could select how many extensions you wish to create, starting with the "Starting Extension" you entered above by using the "Range" drop-down box. This can be done again later if you need additional extensions.

When finished, click save.  


../_images/fusionpbx_ext2.jpg


We now have extensions. 

../_images/fusionpbx_ext3.jpg

You can customize internal, external, caller id and other options by clicking the edit icon beside each new extension.

../_images/fusionpbx_edit.jpg
 

Here are a list of fields and their function:

 
  • Extenson: This is the extension number or name if used with Number Alias
  • Number Alias: Number extension if extension is a name
  • Password: mouse over to see the password
  • User List: Add a user for this extesnion to login to the FusionPBX GUI interface
  • Voicemail Password: Password for this extensions voicemail
  • Device Provisioning: Used for hardware devices like voip phones and ata’s
  • Account Code: Can be used for billing
  • Effective Caller ID Name: Used for internal caller id
  • Effective Caller ID Number: Used for internal caller id
  • Outbound Caller ID Name: Used for external (public) caller id
  • Outbound Caller ID Number: Used for external (public) caller id
  • Emergency Caller ID Name: Can be set to a national standard or local emergency entity
  • Emergency Caller ID Number: Can be set to a national standard or local emergency entity

../_images/fusionpbx_ext4.jpg